The battles of Dagorlad, Orodruin, Fornost, Azanulbizar and Morannon
(This page is rather provisional. I expect to edit and add to it.)
Most of the battles of significant detail I have covered. Now I treat some of those where the details must be created out of
"whole cloth." The very brief narratives give us some over all strategic sense, and that is what I will use as the pivotal moment in each battle as a war-game.
Dagorlad:

The Last Alliance of Men and Elves, led by king Elendil of Gondor and high king Gil-galad of the elves of Lindon, encamped outside the Black gate on Dagorlad ("battle plain"). Their combined host "was fairer and more splendid in arms than any that has since been seen in Middle-earth, and none greater has been mustered since the host of the Valar went against Thangorodrim (at the end of the First Age)." Durin of Moria, with his kin, fought on the side of the Alliance: but dwarves (though few in number) fought on the side of Sauron too: "All living things were divided in that day, and some of every kind, even of beasts and birds, were found in either host, save Elves only."
Sauron's army came out and the battle was a victory for the Alliance: "for the might of the Elves was still great in those days, and the Númenóreans were strong and tall, and terrible in their wrath. Against Aeglos the spear of Gil-galad none could stand; and the sword of Elendil filled Orcs and Men with fear, for it shone with the light of the sun and of the moon, and it was named Narsil."
It appears that this battle (and later, during the seven-years siege of Barad-dűr, and the battle of Orodruin at the end of it, when Sauron comes out and fights with the kings) is a natural for concentrating on the heroic powers of individual champions and their magic weapons. Nothing in Sauron's arsenal (except his person) can compare with the might of Elendil/Narsil and Gil-galad/Aeglos.
The comparative strengths of the two hosts should give quality to the Alliance and greater numbers to the army of Mordor, which should have a slight numerical advantage in "points" if you are "buying" your armies, say 1.25 to 1. Without some advantage on his side in terms of over all strength, I doubt Sauron would have risked an open battle at all. Total numbers, realistically, would have been enormous for this most apocalyptic of battles in Middle-earth since the First Age: I imagine anywhere from 50,000 on up. (Each age ends in an apocalypse; and each succeeding age's apocalyptic showdown is smaller than that of the preceeding Ages'.)
The "secret weapon" of the Alliance is in the fearsome strength of their two champion kings: the effect of their presence upon the morale of Sauron's troops should be quite decisive: boost morale for the units led by Elendil and Gil-galad, and reduce the morale of all enemy troops within, say, 3" of the figures representing the kings: also require a morale check of Mordor whenever the kings encounter fresh enemies.
Leader stats:
Gil-galad +4 CRT +3 LDR +3 Save
Elendil +3 CRT +2 LDR +3 Save
Isildur +2 CRT +1 LDR +5 Save
Morale should average "B" for the Alliance; but it goes up to "A" where Elendil is leading; and perhaps "A"-plus where Gil-galad is leading. Mordor troops who face Elendil or Gil-galad are already "D" class and should test morale as "D"-minus (not just "dogs" but "craven dogs").
Orodruin (mount Doom)
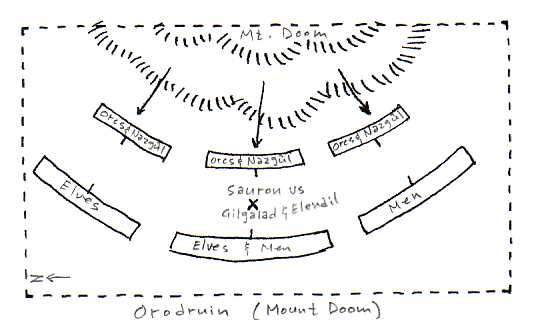
(note: I have made the provisional map with mount Doom as the centerpiece: there are fortifications here too: I am unsure as to where Sauron was keeping himself: Barad-dűr, or mount Doom.)
This final battle of the seven-years siege of Barad-dűr is when Sauron desparately issues forth and attacks Elendil and Gil-galad. They are killed by his heat, but he in turn is vanquished, and while prostrate, Isildur comes with the shards of his father's sword, Narsil, and cuts the One Ring from Sauron's hand, thus disembodying the dark lord.
Character stats:
Gil-galad +4 CRT +3 LDR +3 Save
Elendil +3 CRT +2 LDR +3 Save
Isildur +2 CRT +1 LDR +5 Save
Sauron +7 CRT +3 LDR +6 Save (versus normal weapons - zero Save versus Elendil/Narsil and Gil-galad/Aeglos)
Nazgűl +1 CRT +1 LDR +6 Save (versus normal weapons - zero Save versus Elendil/Narsil and Gil-galad/Aeglos)
Sauron's Heat:
While they are in combat with Sauron, Gil-galad and Elendil must test each turn with 2d6: on the first combat turn, a roll of 2=burned alive; second turn of combat, a roll of 2,3=burned alive; each combat turn thereafter is an increment of one to the chances of being burned alive: they may attempt a Save against Sauron's Heat. The combat cannot go any longer than eleven turns before their death by heat becomes unavoidable (if they do not Save against it each subsequent combat turn). Make the test for Sauron's Heat (and Saving rolls) after the combat roll. (This means that the heroes can vanquish Sauron, and possibly die also in the same turn - as it occurred in the story.)
What can make this otherwise "walkover" battle (for the "good guys") interesting is this personal confrontation between the commander champions. Sauron is invulnerable against all other weapons except Aeglos and Narsil. The rank and file of the Alliance will not have the sustained courage to encounter him; so there should be the main battle raging all around while a clear space in the midst has this epic duel of champions going on. It should be even-steven: if Sauron wins, his presence will make the battle a lost one (most likely) for the Alliance. At the very least, he can reenter his fortress and defy the weakened Alliance successfully.
There were probably some of the Ring Wraiths present. Their and Sauron's effect upon the morale of the Alliance should be considerable - if Elendil and Gil-galad are otherwise not present to counter it. Pluses to morale on their side for being near, and minuses to the morale level of the enemy should be in the nature of a comparison: e.g. Sauron is a +3, his Nazgűl are +1; Elendil is +2 and Gil-galad is +3: all morale effects are therefore cancelled out if opposing champions are equal, or, +1 (+2) for the one with a points advantage.
Numbers for this final confrontation should favor the Alliance by as much as 2 to 1; and they already have an established quality advantage. The even-steven fight between Sauron and the kings, while his Wraith(s) oppose their army, could create an interesting delaying, seesaw battle of shifting fortunes. As already mentioned, the average morale of the Alliance should be "B" and Mordor "D" (though allowed pluses where leaders of a unit possess a higher LDR rating than the opposing commander's).
Fornost:
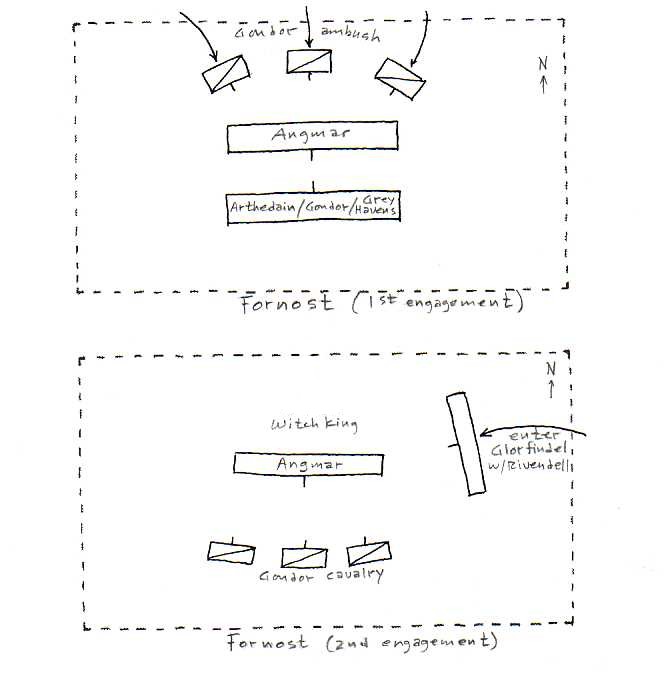
The Witch-king of Angmar (chief of the Nazgűl) had taken over Fornost, the capital city of Arthedain: the northern line of kings had become extinct in the wars, and the Witch-king felt himself supreme.
But king Eärnil sent his son Eärnur, the captain of Gondor, with many ships and a great army. This force came into the Grey Havens and formed the main body of a muster of northern allies, including elves under Círdan. The Gondorian army contained an impressive force of cavalry, captained by the proud princes of Rhovanion. Once the muster was complete, Eärnur and Círdan led it toward Fornost. The victorious Witch-king was by then scornful of his enemies, and issued from his fortress to sweep them (so he thought) into the Lune. But the main body of Gondorian cavalry had been sent to the north around the hills to take the army of Angmar in the rear. This happened even as Angmar was beginning to give way and retreat toward Fornost. Then the whole of the Witch-king's host broke and scattered in a "great rout." He pursued his way north toward Angmar, gathering what he could from the wreck. But "before he could gain the shelter of Carn Dűm the cavalry of Gondor overtook him with Eärnur riding at their head." Elves from Rivendell under Glorfindel came at the same time upon the field and the Angmar host was so thoroughly defeated that not an evil man or orc remained afterwards west of the Misty mountains.
In the midst of this last battle, the Witch-king came forth personally and maddened the horse of Eärnur with fear so that it could not be mastered, and it bore the captain of Gondor far from the field. Glorfindel on his white horse confronted the Witch-king then, and he fled into the gathering shadows of night.
The first battle obviously hinges on the fact that the Witch-king underestimates the strength of his foes; not having heard adequate news of the arrival of the army of Gondor. So Angmar's army is outclassed, even not counting the main body of Gondorian cavalry, which comes on as an ambush later in the battle.
I think 5,000 Gondorians (c. 2,000 as cavalry), 2,000 men of Arthedain and 3,000 elves from the Grey Havens: versus 8,000 for Angmar is a good balance. Gondor averages as heavy armored; the elves as mediums, with perhaps 10% as horsed archers; the Arthedain infantry are mostly light spear with perhaps 10% archers (treated as "Byzantine" militia foot). Angmar is 50/50 men and orcs. They average as light infantry; treat them as "Germanic" horde, with perhaps 10% wolfriders (unarmored or light cavalry with bows and javelins). Morale is "A" for elves; "B" for Gondor; "C" for Arthedain; and "D" average for Angmar.
The Witch-king does not come out until he sees his army getting worsted: the first unit to rout allows a 1d6 roll=5,6 and he comes out: a second routing unit increases the chances to 4,5,6; and so on, until he comes onto the field. He has a +1 effect upon any unit's morale that he personally leads: and within 3" of his person all "good guys" must check morale at -1. Over the whole battlefield, the Witch-king causes a 40" morale check (standard with no modifiers): this is a one-time check: once a unit has made their morale check (or recovered good morale) they need not check again, except for being personally engaged by the Witch-king (within 3"); this check is also a once-only check.
The arriving Rivendell elves should make the second battle a walkover for the "good guys." Until then, it shouldn't be a done deal: because only the Gondorian cavalry are involved against the dregs of the Witch-king's army, which could still be a considerable force, especially with him being present. So, give Gondor what they had left from the first battle, plus 60% of their casualties. The Rivendell elves number 2,000. The Witch-king's dregs number 2,000 (or whatever he saved getting it off the table - unrouted - from the first battle, whichever is more).
Azanulbizar:
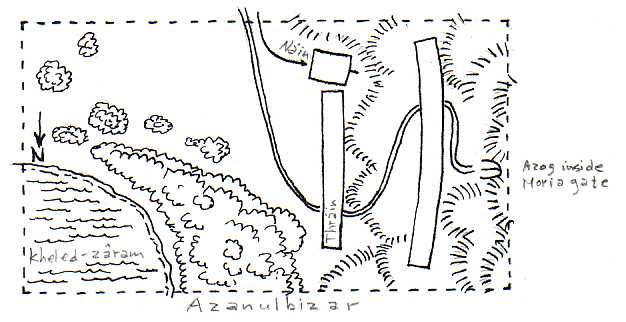
This battle is not terribly large. The great war between the orcs of the Misty mountains and the dwarves had been going on for years, and this was the final showdown. It was the biggest battle in that war, but the dwarves had already killed off an enormous amount of orcs/goblins before now. The whole strength of the dwarves was gathered into the Dimrill Dale, except the dwarven contingent from the Iron hills, led by Náin, which was still on the way - and in fact arrives late in the battle. This forms the pivotal moment where the battle changes from a draw - or dwarven defeat - to a victory for the dwarves.
The battle begins with an all out attack up the hill by the dwarven vanguard, led by Thráin, which is pushed back into the trees near the lake. (A youthful Thorin Oakenshield - of The Hobbit fame - gets his epithet in this battle at Thráin's side, by using a stout oaken branch to parry with.)
The main body of dwarves fights uphill, and it is a slogging match with neither side getting the upper hand for a long time. Then the dwarves of the Iron hills come on the field and cut their way to the very gate of Moria. Azog comes out and battles one on one with Náin, whom he mortally wounds. Náin's son, Dáin, pursues Azog to the doors of Moria and slays him.
All we know about numbers is that the dwarves were the inferior force. I recommend a force of orcs around 5-6,000 (c. 500 "elite" Uruk-hai/half-orc types inside Moria gate with Azog as his bodyguard). The dwarves should have 500 to 1,000 led by Náin come on late in the game; the main body at the start of the battle should be around 3,500, or perhaps less. They should average as heavy infantry and the orcs should average as light infantry. Morale should average as "B" for the dwarves; and "D" for the orcs.
Battle of the Morannon
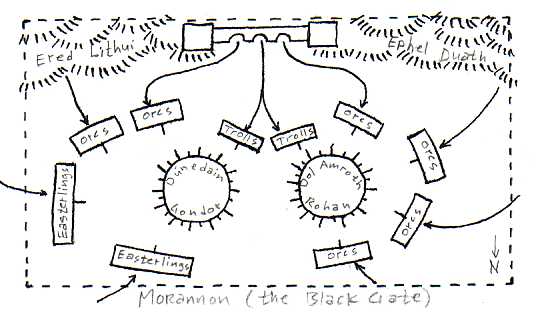
Fought near or on the same ground as the battle of Dagorlad, this is the final battle of the Third Age and the War of the Ring.
Aragorn and Gandalf lead the victorious survivors of the battle of the Pelennor fields to the Black Gates (the Morannon), in order to distract Sauron from looking for Frodo and Sam as they (hopefully) enter mount Doom and destroy the One Ring. As far as their strategy goes, it worked: Sauron bent his whole will and the reserves of his gathered armies on the destruction of the puny and "prideful" army of the West. (So he thought: and supposed that Aragorn must possess the One Ring, for him to be so filled with hubris that he would defy the might of Mordor.)
The total forces of the West gathered amount to not more than 6,000 men. They take station on the two slag heaps outside the Black Gates. Elladan and Elrohir, the sons of Elrond, and Legolas, are the only elves present; they are in the midst of Aragorn's elite unit of Rangers (the Dúnedain) and are placed on the left to meet the first onslaught, with the army of Gondor completing a shieldring of spears. Dol Amroth, led by their prince, Imrahil, are similarly placed on the right, with Rohan (led by prince Éomer) dismounted also in a shieldring. The total forces behind the Morannon, and massed in the crevices and canyons of the Ered Lithui and Ephel Duath, outnumber the tiny army of the West by more than ten to one.
A parley with the "mouth of Sauron", his chief lieutenant in command of the Black Gates, shows that Gandalf's presence can frighten the enemy badly still, even though he feels confident of victory. The "mouth of Sauron" flees back to the safety of his troops and launches his attack: orcs pour down from the mountains, and issue from the gates with trolls: Easterlings come up from their concealments east of the furthest tower of the Morannon. Then Aragorn and his comrades are utterly surrounded in a sea of foes.
Trolls open the battle, and break down the shieldring. But the sons of Elrond and the other champions resist them stoutly. The whole army of the West is fully engaged in a lost battle.
Of course, as the book describes: the One Ring perishes in mount Doom: Sauron's life force is banished: his fortresses fall suddenly in ruin, and his minions of the dark - orcs and trolls - flee in abject fear. The leaders of the West know that the dark lord is overthrown. So too do the chieftains of the Easterlings. But these are Men, and they will not merely flee. Aragorn must lead his army in an attack and drive the Easterlings from the field. (As he does so, Gandalf flies with the Eagles to the rescue of Frodo and Sam.)
As a war-game, the Morannon hinges on timing alone. If the One Ring is not destroyed soon enough, there will be no army of the West to save. So the best way to keep up the suspense (if you are not going to adhere strictly to the timing of the story) is to roll the dice each turn after 2d6 game turns have elapsed - after battle is joined: if you roll 2d6=2 on the first turn of checking, then the One Ring has been destroyed: each turn of failure increases the chances by +1: so the second turn requires a 2d6 roll=2,3 to destroy the Ring; the third check=2,3,4, and so on, until the One Ring IS finally destroyed.
Upon the One Ring being destroyed, the Morannon falls in ruins: the orcs and trolls check as "D" class troops -1: i.e. they need 2d6=10,11,12 to not run away in rout. The Easterling units do not check for seeing orcs or trolls rout, nor do they check themselves.
As for forces, Mordor's army should be (as the map shows) c. one-third Easterlings, the rest orcs and trolls (about 10% as trolls, with the balance orcs). All orcs and trolls are "D" class morale: the Easterlings are "D" and "C" class morale. They should number over 60,000 total troops. To reflect this battle's numbers, you can field the Mordor units which can actually reach the two shieldrings: the rest are lined up in the rear waiting their chance to come to sword strokes.
Special morale rule - Mordor: When a Mordor unit routs from taking 25% casualties, only those along side of it will check for seeing this: a special exception applies to all Mordor units lined up in the rear: they will NOT check for rout when they see a unit already in combat rout, but will be available to move up and take the routed unit's place: only when the One Ring is destroyed will ALL orc and troll units each make a rout test (needing 10,11,12) to stay and fight.
Special morale rule - the West: The shieldrings if broken will not require any morale test for casualties: the warriors of the West must be killed to the last man: they will not rout, while they occupy the slag heaps. (Later, when they attack the Easterlings - and any orc/troll units which stayed - the units must make normal 25% casualty morale checks.)
The champions of the West have character bonuses:
Aragorn +3 CRT +3 LDR +5 Save
Éomer +2 CRT +1 LDR
Gimli +2 CRT +3 Save
Legolas +2 bow +1 CRT +3 Save
Gandalf +0 CRT +3 LDR (his status since Pelennor is fully accepted by the whole army - whereas before, his reputation was mixed and suspect - thus his zero LDR in Helm's Deep and Pelennor fields) +5 Save. (Magic is 1d6 firebolts with a 12" range: one per turn: each does 1d6 enemy bases killed - trolls are immune.)
Elladan +2 CRT +3 Save (ditto Elrohir)
Prince Imrahil +2 CRT +2 LDR
Leaders for Mordor:
The "mouth of Sauron" +1 LDR +2 CRT
One chieftain general for the Easterlings +1 LDR +1 CRT.
The Eagles arriving can be handled simply by adding a combat bonus of +1 to each roll in favor of the West (reflecting a "distraction" factor of the Eagles stooping upon the host of Mordor, and perhaps some deaths directly attributed to Eagle attacks: but I feel that in such a huge battle, the Eagles would be extremely vulnerable to missile fire each time they came close enough to seize with talons or beak). This bonus should come fairly early in the battle: say, 1d6 turns after combat begins. Each Mordor archer base that shoots into the air (archers should not be more than 10% of total troops) will need an 11,12 to take down an Eagle: each hit reduces the number of total hand to hand combat bonuses for the West by -1: a little record keeping will take care of this: note how many combat resolution rolls there are to complete a turn, and for each hit on an Eagle the total of +1s is reduced by one. For example: if there are a total of 50 combat resolutions, then a hit on an Eagle this turn reduces this from now on to 49 combats where the West gets +1.