....where the Műmakil came there the horses would not go, but blenched and swerved away....
....where the Műmakil came there the horses would not go, but blenched and swerved away....

Alan Lee's Pelennor Fields: note the size of the Műmakil and the towers on their backs.
I used this illo as the basis for my models in the miniatures photos.
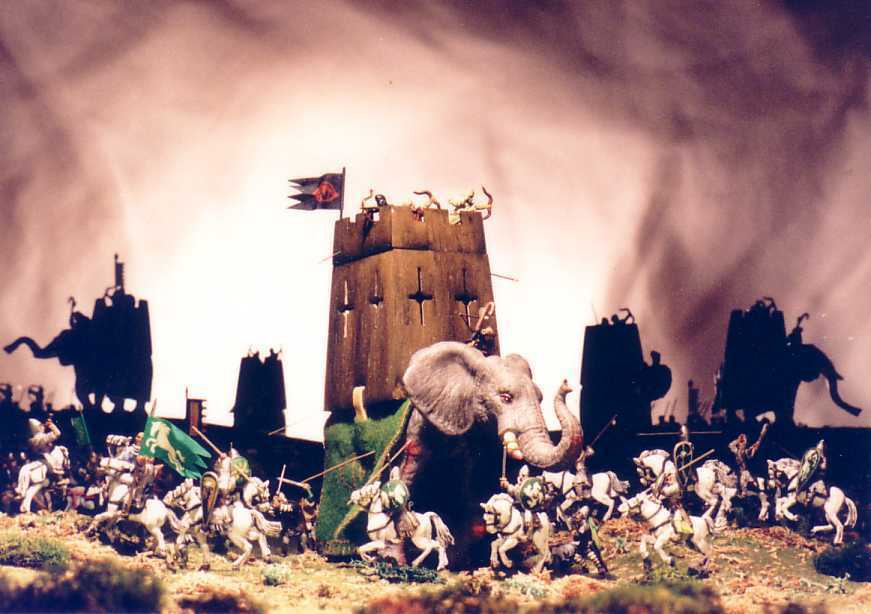
Another lighting variant; in a way, I like the sky better in this one; and note the dismounted Rohirrim.

This one was shot with the room lights on and shows up a little more detail, and banishes the gloom of "Mordor."
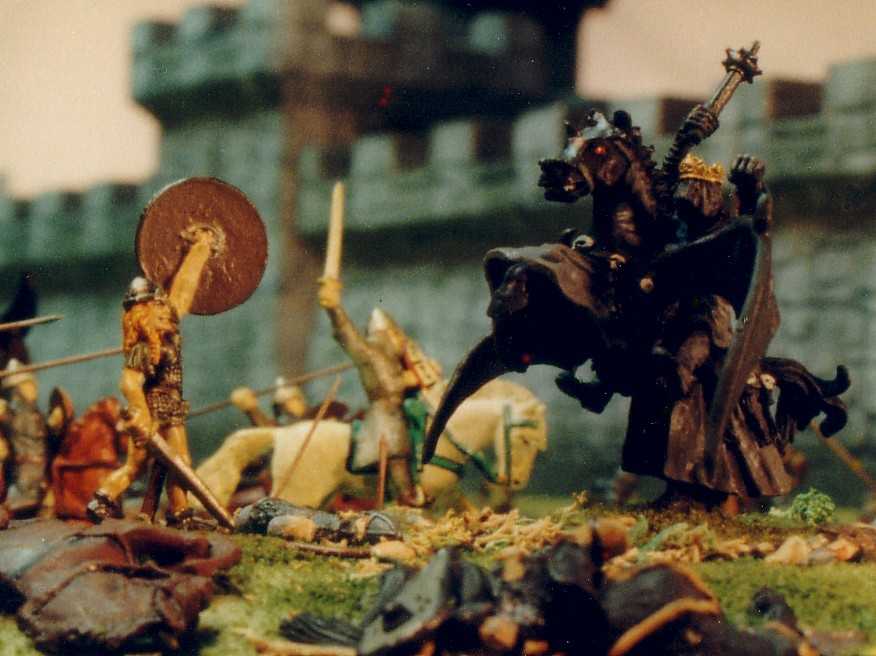
Éowyn and the Witch King
BATTLE OF THE PELENNOR FIELDS
Tolkien was somewhat vague. A careful reading of the battle outside Minas Tirith yields an incomplete picture from the viewpoint of the tactician. The knights act like knights should, and the Haradrim from the desert seem to resemble Arabs; but we are dealing not so much with a novel as literature with greater content than mere tactics and weaponry.
This does not satisfy the rabid wargammer. The battle of the Pelennor Fields is an epic fight and very complex. Not only do troops arrive with surprise, and throughout the battle, but the evident variety of troop types is almost staggering. Look at the list of general classes:
1- Knights: of Rohan, Dol Amroth, Gondor and Harad (no two are the same, either in morale or quality of prowess).
2- Infantry: of Dol Amroth (implied as mounted), Gondor, Harad and Far Harad (Southrons?) including troll-men, Easterlings and Variags.
3- Other horsemen: Variags and masses of Haradrim.
4- Monsters: big trolls (stone and mountain), goblins, orcs, Uruk Hai, and the enormous Műmakil (elephants of legendary size).
Players wishing to refight the Pelennor Fields could get into difficulties right away trying to work out betweem themselves what all those troops can and cannot do. Most rules involving fantasy armies are an admixture of the developers' favorite bits and pieces; they borrow shamelessly all of Tolkien's elves, dwarves, orcs, etc., and then mash them together in some brewed-up world that is useless for playing out Middle Earth battles. Among those rules sets which cater to the Middle Earth genre, almost without exception they are designed for role-playing and the skirmishes those games produce. Trying to fight out a huge battle can take literally weeks.
It is the purpose of this article to give the reader a simple and quick method for playing the Pelennor Fields in a single evening. To do this it works very well to assign some historical type for each of the armies involved in the battle. (This will not eliminate arguments, but will at the very least give us all something concrete to argue about!) Also, rules for morale and tactics can be tailored - cobbled together - to fit this one fight, making the game run smoothly.
GONDOR
Throughout her history the army was a minority of mounted nobles and their small households, mustered alongside the masses of infantry which were the citizens under arms. Thus we can look to northern Italy in the medieval period, which was a citizen militia army. Up until c. 1300 the mercenary element was very small. The noblemen did not lead the militia spearmen and marksmen, but brought their own contingents, which formed a minority.
The tactics Gondor infantry can make particular use of are: a phalanx of spears against charging cavalry; the marksmen can shoot over the heads of the spearmen, who are drawn up in front.
The tactics of the cavalry are: a lance or drawn sword charge; the trained ability to withdraw from a combat to reform and charge again; and the use of javelins from horseback.
DOL AMROTH
This distant fief of Gondor is populated by the half-elven. Their knights are without peer in the world. But they are not a numerous people. A type of cavalry from history that works well as a model is the Military Order knight, eg. the Templars, from the Crusades. Imrahil ought to be able to lead his knights through the same tactics: a furious charge which can keep going long after other cavalry have loosened up and played out; but also the ability to withdraw from a bad situation to reform or charge again. the retainers are mounted infantry or lighter cavalry in the back ranks. There is no real difference in the way they fight when mounted.
On foot, the infantry and dismounted knights are not inferior to the Gondor militia spearmen, with the added ability to withdraw from a combat.
ROHAN
The Rohirrim are quite well-detailed in Tolkien's story. I think they were his personal favorite, being Celtic in flavor. But almost any early medieval cavalry will do for them. Perhaps the best is the army of Charlemagne, c. 750 to 1000. His army remained largely unaltered during the generations following his passing.
It is nearly always cavalry alone in the battle, the foot being told off to the rear to guard the wagons and spare horses, etc.
For tactics, all the horsemen use javelins and charge with the lance. They can withdraw from combat too. Their charge is no more furious than the horsemen of Gondor, and they tend to be lighter-armed. About one fifth use a very effective bow.
None of Rohan's infantry were present at the Pelennor Fields. But should the cavalry dismount they make a very effective infantry force themselves: they phalanx-up with their long lances against cavalry; they can throw their javelins just before melee contact; their bowmen can fire overhead from the rear ranks; but they have a ponderous time trying to maneuver, such that Rohirrim cavalry dismounted are always on the defensive.
HARAD
This enormous geographic area is home to a diverse population. But they share the desert in common. Several Islamic-type armies could work, but I believe the best overall is an Abbasid or Umayyad army, c. 850 to 1000 AD. This army is large in cavalry but has substantial infantry as well. At the Pelennor Fields over half the Haradrim seemed to be horsemen - at least they got top billing. This is where Tolkien is frustratingly vague. No bowmen are directly mentioned. But we can assume the reason is because Rohan's charge reached them before they could ply their bows, at first; and then later, when the army of Mordor was aware how out-numbered Rohan was, the chieftain of the Haradrim (whom I have named Narzak) disdained to use his bows and charged in for the glorious melee with king Théoden.
The cavalry of Harad are lightly-armed mainly. The chieftain's guards are mailed and carry powerful bows and long lances. But most of the mass of horsemen are lancers with javelins and possess no body armor to speak of.
The foot are shield-bearing spearmen with a single javelin apiece; the archers are without armor too, but their bows are powerful, though not so good as those in use by the cavalry or the Rohirrim.
For tactics, the cavalry: charge swiftly but on light horses so that their impact is inferior to Gondor or Rohan, and even more so against Dol Amroth; they can withdraw from a bad fight to reform and charge again; and they can fake a rout, which might explain one of the reasons why the Rohirrim got so far forward and in troubles during their lengthy charge.
Harad infantry tactics are not too impressive: they must check morale when charged by cavalry; they open up when they maneuver, making them vulnerable to close order troops; their javelins can be thrown directly before melee contact, but only in open order (or half effect in close order; we define this as full base contact along the edges - open order is a base width between figures, or figure bases); the bowmen must not have spearmen in front of them, or they cannot shoot, ie. they must have a clear front to their target.
In this battle it is best to treat Southrons as Haradrim; it simplifies things greatly.
VARIAGS
It seems evident to me, that, given their extreme eastern origins, these troops should be treated as Turkish. Not Mongols, but simple auxiliary troops suborned by Sauron in whole clans and tribes. They apparently did not make up a large percentage of the army of Mordor.
Cavalry tactics: a powerful bow from horseback (equal to any - in this battle); a light charge like the Haradrim, but Variags can charge in echelon and wheel in upon the flank of the enemy (other cavalry can only make straight ahead while charging); they can withdraw from combat too and fake a rout.
The infantry Tolkien refers to as Easterlings with axes can be treated as the subject foot of the Variag horsemen. Their tactics are very basic: check morale when charged by horse; throw javelins in open order only.
ORCS AND URUK HAI
Although their morale is generally lower, nothing about how Tolkien describes orcs and such indicates that they were to be taken lightly in battle. For one thing, they covered the earth in swarms. Although the historical picture is stretched amite by comparison I like to think of my orcs/goblins as Germanic hordes sweeping across the borders into Roman territory (so why is Gondor's army not Roman legionaries then? Because I like medieval Italians better. Use Romans if you want to for Gondor's infantry).
Uruk Hai are obviously more formidable. I think of their tactics more like that of Vikings in a dense shieldwall. And being more elite than mere orcs, the Uruks get better armor from their masters.
For tactics, orcs must: test morale when charged by cavalry (unless Uruks are mixed into the front rank such that they make up at least one eighth of the total company strength, i.e. Uruks form the entire front rank); and they can: throw their javelins just before melee contact, if they make a performance test first; shoot their bows in open order - thin line - only. They do not maneuver well and loosen up when turning or facing (like Haradrim foot).
The cavalry are allowed: missilefire in open order only; a charge that is no better than a Variag or Harad horsemen - but while the warg is biting at the foe, the goblin rider can still shoot his bow or throw his javelins even in melee (no one else can do this, not even "Germans"; but some tweaking of history is required when dealing with such weird mounts). Once they are in melee they cannot leave except by rout.
Uruk Hai tactics: spearmen planted and stationary when charged by cavalry do not check to receive, but stand automatically; bowmen can shoot overhead from behind the spearmen, but only when the whole phalanx is stationary, and the bowmen must be in open order - thin line - only; the spearmen can throw an axe or javelin just before melee contact, if they make a performance check first; if mixed in with orcs, Uruks fall into open order when they maneuver, otherwise they do not if in units of Uruks only.
The archery of orcs/goblins/ is the most feeble of all, whilst the Uruks use a bow equal to that employed by Gondor's marksmen.
TROLLS AND TROLL-MEN
The great mountain trolls that wielded Grond the battering ram were enormous creatures, much stronger than men. The troll-men of far Harad were probably nothing more than great black men, large of stature and fierce to look upon; but for variety we will treat them like smaller trolls.
For a tactical parallel one would have to look a long time. I have found none. So I hit upon an expedient. In our historical wargame rules we have defined the effects in combat of elephants. I treat trolls like smaller elephants and mount them on narrower bases to reflect their smaller size. Their peculiar ability to resist damage I reflect with 1d6 saving rolls of 6 for the troll-men and 5 or 6 for the mountain trolls (stone trolls should save on a roll of 4, 5 or 6). Trolls cause a morale test on any troops who come in base contact with them.
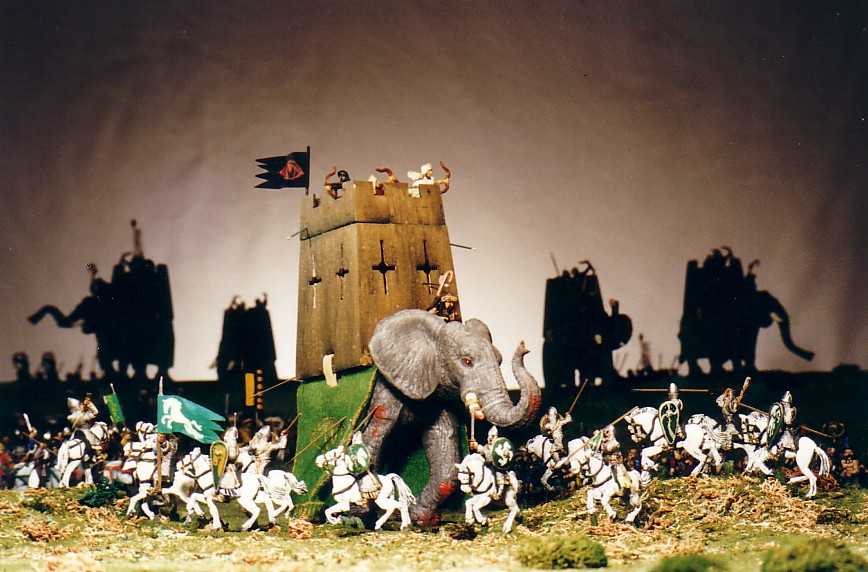
MŰMAKIL
The giant elephant race of Middle Earth is not to be seen anywhere in our own age. (The one depicted in the photos is actually a middling one for size. Alan Lee's illo - on page 688 of the Houghton Mifflin single volume - is better.) But they behave in every particular like elephants.
Historically, elephants were a disappointment to those armies which tried them out in battle. Right away, their enemies would find ludicrously simple methods for making the clever beasts run away (as in the case of Scipio's herd of pigs making Hannibal's elephants run wild at Zama).
No doubt, had the Rohirrim fought Műmakil before the Pelennor Fields they would have been ready for them. But alas, outside Minas Tirith that day the Rohirrim horses were thoroughly spooked and would not close with the enormous pachyderms.
In the game, test morale each turn the cavalry fighting for Gondor are inside 5" of a Műmak; failure means the horsed unit must move outside 5" of the Műmakil. Success will still not allow a melee contact with them, but javelins could be thrown and arrows shot at pointblank range, all at -1 to the dice rolls because of the jittery horses spoiling the aim of their riders.
In our game armored elephants are as tough to kill as a fully-mailed knight. Műmakil should be as hard to kill as a plate-armored knight. The crew in their tower of wood on the Műmak's back should be nearly as difficult to kill; but once slain, the Műmak will test morale (see rule no. 5E below).
(For armies lists to match the above referenced historical armies, you can go HERE.)
RULES FOR FIGHTING THE PELENNOR FIELDS
To play, simply follow each step one by one. At the end of rule 5 one game turn will have been completed.
1- Roll 1d6 for each side; high roll decides which side moves first. roll at the beginning of each turn. Movement may be split in half when enemies get within missile range or movement of each other.
2- Announce all charges by cavalry units. (Run moves can be made without announcement and do not get a charge bonus to combat value [CV]). Targets of a cavalry charge may always move first to try and get out of the way.
A- All routing troops and their pursuers then move their entire movement.
B- Then all withdrawing troops (those listed above which can) make a full movement away: a walk for foot and a trot move for horse.
C- While moving, the figures must face the direction they moved. They must spend a whole turn at one speed before being allowed the next slower or higher speed. Running troops cannot turn (except Variag cavalry in echelon: ie. lined up in a diagonal, half a stand back from each other, which allows them to turn up to 90 degrees and finish a charge move into the flank or rear of an enemy unit).
D- Troops listed as "ponderous" or "loose" when they maneuver will go into open order when they change their facing, wheel or run.
E- When units contact each other, all movement stops for melee.
F- Movement is by armor class and mounted status. All foot and horse walk 4" per turn maximum; Műmakil walk 5" per turn. At a run/charge, foot move: Unarmored/Light = 10" Medium = 8" Heavy = 7". Cavalry move: Unarmored/Light = 18" Medium = 16" Heavy = 14".
G- Unarmored to Medium foot are allowed four run turns per ten turns of movement; the next set of four run moves only allowed after ten turns of resting at only walk speed (troops who exceed this limit because of routing or pursuit can only rest at a stand still).
All cavalry and Heavy foot are limited to three runs/charges with the same restrictions.
3- After all movement is completed, shoot and throw missiles. Troops in melee contact may not shoot - except those specifically allowed to throw javelins just before melee (and Warg riders who can shoot/throw while the beastie bites). Troops in melee may not be shot at (exception ditto).
A- To shoot, roll several matched/colored pairs of 2d6s. Each figure is rolled for that can shoot (those in second ranks cannot, except those specifically mentioned foot marksmen who can fire "screened" by spearmen only). Whole units must be targetted by entire missile units where possible, and closest enemy units must be targetted first. foot can target 45 degrees to left and right of their center front; cavalry can do the same and around the left side to 45 degrees to the right of center rear. Műmakil bowmen fire all around.
B- To hit, a figure must roll the indicated number or higher. Range to target and armor class of target are cross-referenced:
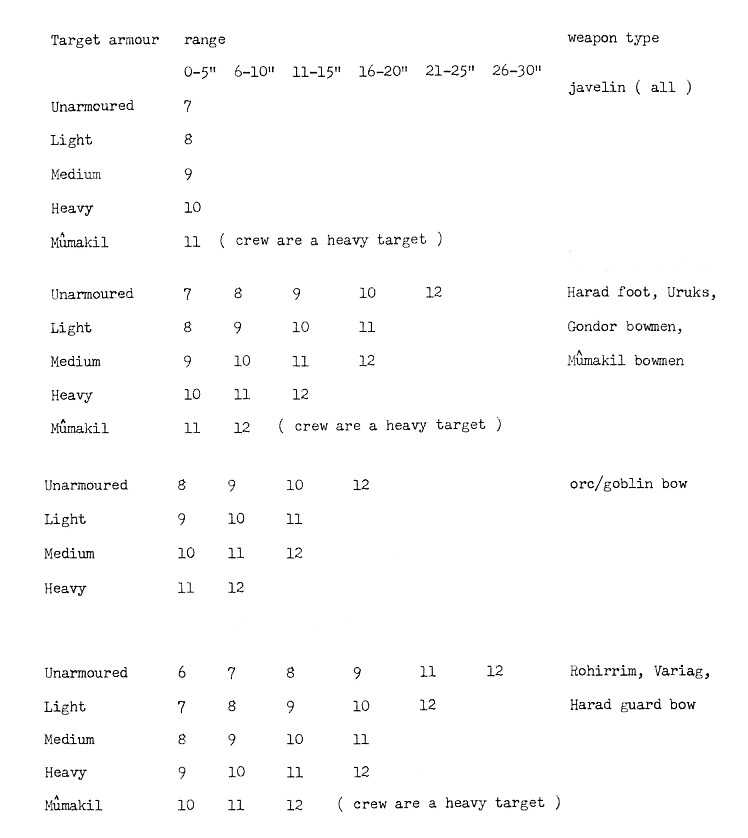
C- All figures take one hit to remove, except Műmakil which take three hits (there are two bowmen and one driver per Műmak).
D- Horsebowmen can only shoot at a trot or walk or standstill, never at a run (you can ignore this rule if you wish, but it is realistic for units).
E- All javelin-armed troops can throw at a run. But Cavalry which have announced a "charge" may not throw javelins or shoot bows.
F- Troops in open order (a full base width between bases) are +1 harder to hit, eg. a 10 or higher requires an 11 or 12 now. Infantry spearmen in close shieldwall are also +1 harder to hit; but bowmen behind a shieldwall cannot shoot while the shieldwall is held. This is a "declared" formation since it is impossible to see using figures: or place a special "shieldwall" marker on the spearmen unit while it is in "shieldwall."
4- Melee combat is resolved after all missilefire is done. The combat values (CV) given are for 20mm of frontage for each infantry figure/base and 25mm of frontage for each cavalry figure/base. If your base frontages are different, then adjust the spacing so that five close order infantry bases match up with four close order cavalry bases.
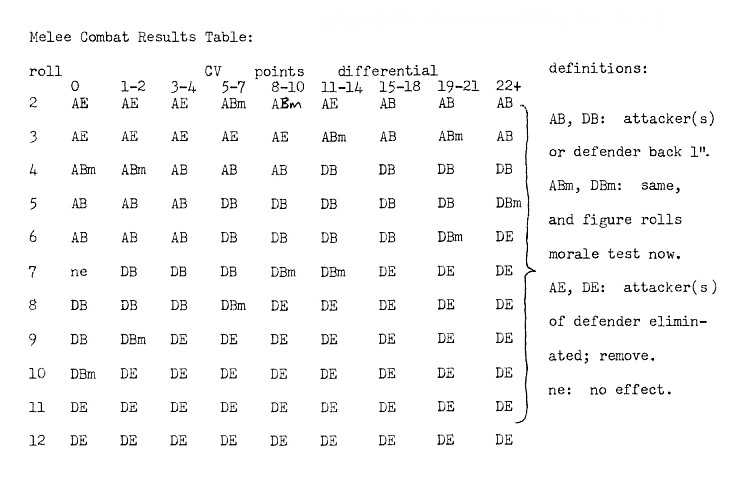
A- Each combat is rolled with 2d6. Where two or more figures gang up on a single enemy, combine their CVs into a single roll event.
B- The results are cross-referenced on column where the final CV difference is found. The attacker always rolls the dice: evenly matched combats alternate rolling as the attacker.
Combat Values:
Unarmored Infantry = 4 Unarmored cavalry = 7 (light charge = 9 full charge = 11)
Light Infantry = 6 Light Cavalry = 10 (light charge = 13 full charge = 15)
Medium Infantry = 8 Medium Cavalry = 12 (light charge = 15 full charge = 18)
Heavy Infantry = 9 Heavy Cavalry = 14 (full charge = 21)
Heavy Troll-men = 19
Dol Amroth Heavy Cavalry = 16 (charge = 24)
Heavy Mountain Trolls = 23
Műmakil = 30 (on 40mm frontage)
C- Gondor, Dol Amroth, orcish spearmen and dismounted cavalry, and dismounted Rohirrim cavalry, all +25% CV rounded up when charged by other cavalry, so long as they do not move on the turn impacted for melee.
D- Troops attacked in flank drop to 1/2 CV (rounded up).
E- Troops attacked in rear or routing drop to zero CV.
F- Műmakil and mountain trolls are full CV when attacked in flank, 1/2 CV when attacked in the rear.
G- Any infantry on a hill above the enemy get +25% to CV; also defending a riverbank.
5- Morale tests are rolled after all missilefire and melee are completed.
A- Units test morale for each 25% of their original strength lost to missilefire, melee or individual routed figures (ABm and DBm melee results). If 50% or more of a unit is lost in a single turn, roll or even three morale checks at once.
B- Units which "see" friendly units rout this turn test also. A routing unit can be seen when hard alongside; or out in front of a unit not engaged in melee combat. Műmakil do not make this morale test.
C- The morale classes require a 2d6 number or higher for good morale. Rolling too low results in a routed unit (ABm DBm have this same effect on individual figures in melee).
Class A = 5 to 12 Class B = 6 to 12 Class C = 7 to 12 Class D = 9 to 12.
D- A unit or single figure which routs does not move on the first turn after routing but stands "milling in confusion", rear to the nearest enemy. Next turn the routing figures make off at run speed and in a line most directly away from all enemies. Enemy units will pursue if within a charge move, unless the player wishes them not to pursue, and performs a successful "performance test" on their morale Class.
E- A panicked Műmak is one whose crew is dead and it has failed a Class D morale roll. If panicked, roll 1d6: 1-2 = Műmak veers left or right (50/50); 3,4 or 5 = Műmak turns away from the present facing 180 degrees; 6 = Műmak goes straight ahead charging. Its speed is 12" per turn and the CV is now 38 per 40mm of frontage. It will melee anything in the way.
F- Routing troops cannot roll to recover if within missilefire range or enemies, or charge range of enemies who are at least 25% of the routing unit's strength (cavalry count as two men apiece; Műmakil as their surviving crew plus three men each). A routing unit may roll three times to recover good morale before leaving the table, unless movement takes the entire unit off the table before then. Once off entirely they do not come back.
G- While routing, troops are zero CV. Any friendlies in the way must fight them for the first turn at 1/2 CV (both parties).
6- Charging Cavalry: who are pushed back in melee lose their charge CV; also those who turn (Variag cavalry in echelon can turn up to 90 degrees without losing their charge CV).
A- When a cavalry charge comes within half a move of infantry, the infantry must test morale as called for. If they stand, then they are like foot spearmen who do not test to stand before charging cavalry, eg. Gondor spear.
B- Spearmen who stand firm before charging cavalry cause them to make a "performance test" on their morale Class to keep their charge CV; failure means they pull up short and revert to normal melee CV (Easterling axemen have this same effect if they stand firm first).
C- Cavalry get their charge until they are out of run moves. Though they are not charging at speed on subsequent turns, they can take their charges - and their charge CV - consecutively.
D- Dol Amroth knights can test morale for further charges, so long as they do not turn aside to melee, nor fail this "performance test" on their morale Class. Once they have charged four or more turns, they can only walk until rested (see rule 2G).
E- Charging cavalry cannot be melee attacked in their flank. If they are moving faster they may not be attacked in their rear either. ("Faster" means potential top speed, not actual distance moved this turn.)
7- Special maneuvering rules: These are not essential for enjoyable play once or twice. But I have found the game more satisfying as a tactical exercise if you use the following rules. Without them, the units tend to whip around freely like ant hordes. To my mind, a figure on a base represents a company of men, when afighting army-scale battles. (In fact, in our rules the scale of the game is 1" to 10 yards on the ground: each turn represents c. 30 seconds of real time for fighting and movement purposes: A 20mm base is 64 infantrymen in eight ranks and a 25mm base is c. 50 cavalrymen.)
A- Infantry must be in open order before they can reverse their facing. Getting into open order takes one turn; then the reversing maneuver takes a turn, and the unit can either move 2" or return to close order. Withdrawing Dol Amroth foot ignore this restrictive rule.
B- Cavalry are limited to 90 degrees of direction facing per half turn while moving at a trot. At a walk they can turn 180 degrees in one half turn, and move 2" in the second half. They do not need to go into open order first (horses being long of body have plenty of space to turn around when moving off left or right). When withdrawing after a melee combat, the unit is at trot speed and can opt to either face the enemy or away, in open or close order as they choose.
C- Infantry spearmen in close order will not voluntarily give up their secure formation. They must make a morale test first before they will voluntarily go into open order.
D- All marksmen on foot can reverse in close order anyway. They do not line up behind each other like phalanx troops do (being more in a checkboard man for man to increase visibility); they move 2" on turns they reverse at a walk.
(The above rules are modified and specified from our commercially available, historical war-game rules, The Art of War - tactical warfare in miniature for pre-gunpowder armies
by D. Larsen and R. Russo copyright 2005. Scroll down and click on the "click here" link. You may copy these charts and rules - in this file you are currently reading - and play freely; just don't sell).
PLAYING THE PELENNOR FIELDS
The order of battle is according to the map: note the letters:
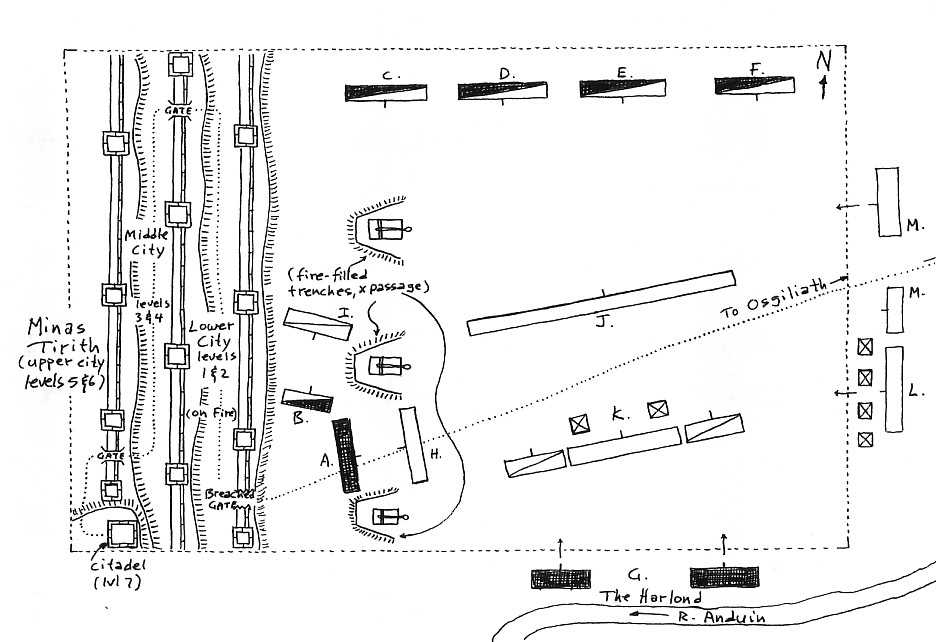
Gondor's Army:
A: 16 heavy infantry spearmen from Dol Amroth; Morale Class a. 16 heavy Gondor infantry of Minas Tirith; Morale Class B. 16 light infantry bowmen; Morale Class B.
B: 10 Dol Amroth and Gondor knights (treat composite unit as all Dol Amroth cavalry); Morale Class A. Lord Imrahil +2 CRT +2 LDR.
C: Elfhelm's Éored: 10 heavy cavalry, and 6 light cavalry with bows; Morale Class C. Elfhelm +1 LDR.
D: King Théoden's Éored: 8 heavy cavalry; 8 medium cavalry; Morale Class B. Théoden +1 CRT +2 LDR.
E: Éomer's Éored: 8 heavy cavalry; 8 light cavalry with javelins; Morale Class B. Éomer +1 CRT +1 LDR.
F: Grimbold's Éored: 8 Heavy cavalry; 8 light cavalry with bows or javelins; Morale Class C. Grimbold +1 CRT.
G: Aragorn with levies of South Gondor: 16 heavy infantry spearmen; 16 medium infantry spearmen; 32 light infantry with javelins; 8 light/medium infantry bowmen (Dúnedain rangers, Aragorn's bodyguard, Morale Class A); all other troops Morale Class B. Aragorn +2 CRT +5 Save +3 LDR.
Mordor's Army:
H: 16 heavy infantry Uruk Hai spearmen; Morale Class C; 10 light infantry Uruk Hai bowmen; Morale Class C; 3 Mountain Trolls and 3 Troll-men; Morale Class C; Trolls and Troll-men +1 CRT (save is 1d6 = 6 for Troll-men and = 5, 6 for Trolls: a "save" makes any melee elimination as a NO EFFECT. Trolls cannot be killed by missilefire.)
I: 20 light cavalry Variags; Morale Class C.
J: 20 light cavalry goblinWarg Riders and Wargs with bows or javelins; Morale Class D; at least 18 light infantry orcs, spearmen and bowmen, and 8 light infantry Uruk Hai spearmen (to "stiffen" the orcs); Morale Class D; 32 medium infantry orcs, spearmen (with a "stiffening" of Uruk Hai so they won't have to check morale when charged); Morale Class D.
K: 20 medium cavalry guardsmen (with "Narzak" +1 CRT +1 Save); Morale Class B; 20 light cavalry with javelins; Morale Class C; 32 light infantry spearmen; Morale Class D; 32 unarmored infantry bowmen; Morale Class D; 2 Műmakil; Morale Class D; All these troops are Haradrim.
L: 64 light infantry Southrons, spearmen; 64 unarmored infantry bowmen; 4 Műmakil; Morale Class D all; "Gothmog" (a Nazgul) +1 CRT.
M: 64 light infantry Easterlings, axemen with javelins; Morale Class D; 40 Variag light cavalry; Morale Class C.
The Witch King of Angmar, Sauron's chiefest commander (and the chief of the Nazgűl), has just turned away from facing Gandalf the White in the broken gateway to the Lower City; for the horns of the Rohirrim are echoing across the Pelennor. The cavalry of king Théoden have arrived and slaughtered thousands of orcs in the north end of the battlefield. Now they have regrouped and are prepared to charge into the main Mordor host and camp.
Thus, at the start of the game, the cavalry of Rohan are drawn up, ready to charge again; and the main army of the Witch King is facing them down.
Timed Events
1- Roll 1d6 at the end of each game turn, beginning with game turn two, until a roll of 5 or 6 signifies the forces from Minas Tirith sallying out. (forces A and B on the map).
2- On the third turn following Imrahil's sally (event 1), begin rolling 1d6; a 5 or 6 brings on the Witch King, who descends upon the Éored of king Théoden. Théoden's troops must test morale at -2 from their roll: Théoden is a +2 leader making his Class B troops good with a 4 to 12 roll, -2 for the Witch King; he is invulnerable to the blows of any "man." His CV = 16; charging down from the sky his CV is 24 on the first turn of melee. He is +1 CRT and his LDR +2. He can fly 14" per turn (each inch climbed is -1 ground speed; each inch dived is +1 ground speed); and he can select any single figure to attack on his first charging attack within reach.
(Éowyn and Merry are not characters for the players to use in this game: rather, they are an "event pair" of NPCs. When Merry makes a Class C morale test (rolls 2d6 and gets 7 to 12), he can stick the Witch King from behind with his elvish blade. This allows Éowyn to attack with a CV = 9 vs zero while the Witch King is doubled over in pain. Any hit Éowyn put on the Witch King before this killed his flying steed (which is not immortal). If the Witch King dies at this point, Éowyn and Merry are in any case out of the battle, being stunned nearly to death by the evil power of the Witch Lord as they struck their weapons into his body.)
3- After the appearance of the Witch King, roll 1d6 each turn until a 5 or 6 brings on forces L and M from Osgiliath.
4- After L and M arrive, play for 1d6 more turns, then roll 1d6 each turn thereafter, until a 5 or 6 brings on Aragorn (force G).
Upon Aragorn's arrival by boat up the River Anduin, all Mordor units within 12" of the Harlond must make a morale test (at -1 from all rolls if the Witch King is dead). Failure means they rout toward Osgiliath. News of Aragorn's coming spreads 12" per turn, requiring morale tests upon each Mordor unit within that range that has not already checked morale for this.
Failure of the West
Should the defenders of Minas Tirith be worsted, they can retire into the Lower City. If the Witch Lord still lives, Gandalf will face him again for the last time. The first of them to roll a 5 or 6 (1d6 each turn) kills the other. Only a roll of 6 will beat a 5, otherwise both matching with 5s or 6s will kill them both. Loss of their champion will cause morale tests on all units: Mordor units at -1 from their rolls; Minas Tirith defenders can +1 to their rolls (home ground advantage for the good guys).
If the Witch King is already dead, Gandalf can expend 1d6 fire spells to defend the City: roll 1d6 each and that is how many enemy figures are removed within 12" of himself. If Gandalf had to defeat the Witch King in a duel, his powers are depleted, should he still survive, and he can do nothing more for Gondor.
The Leaders
Few are mentioned on the Mordor side. Many are given stellar roles on the side of Gondor. In the game I have only given Mordor three. "Narzak" is the Haradrim leader and is one of the medium cavalry in the guard unit. The third is Gothmog, the second in command of the Mordor host. He is a heavy cavalry Nazgul of lesser powers (causing no morale checks and not being invulnerable to men's weapons; also he does not fly. But I would add here that he cannot be killed while the Witch King still lives, only afterward.)
In the order of battle, the leaders have one to three stats listed: CRT, Save and LDR.
CRT means the dice rolls on the melee CRT are adjusted in favor of the leader up or down as he wishes, by the amount of his CRT plus. If opposing leaders melee eath other, then only the CRT advantage (if any) is used by the leader with the advantage, eg. Aragorn vs Gothmog would get +1.
LDR stands for Leadership. the value of the plus is added to all morale tests for rout only; and only for the unit the leader is personally leading. >br> Save means a saving roll, in the same manner as for Trolls and Troll-men (only in this case it reflects potential destiny). A +1 Save allows the eliminated leader to roll once on 1d6 and hope for a 6 to save him; a +2 Save needs a 5 or 6. (Aragorn has the maximum of +5 because of his powerful destiny; anything above a roll of 1 will Save him; he could take a lot of "killing".)
PCs like Gimli or Legolas can be added. Even orc and Uruk Hai or other Mordor PCS can be given out if you have a large group of players involved. But no one should run more than one; keep pluses to Save and CRT only, and +2 maximum. (1d4 pluses is a good way to randomize the total.)