
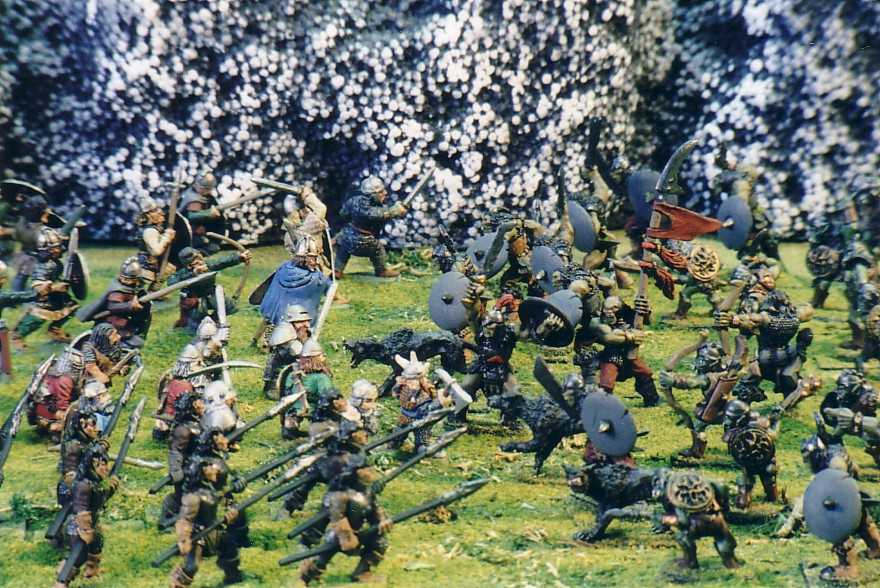
Dusky Woodland Elves, Dwarves of the Iron Hills and Lake-men battle the Goblins and Wargs of Mount Gundabad.
THE BATTLE OF LONELY MOUNTAIN
Actually, right off the bat, I should admit that the title of this article is a quibble: "The Battle of Five Armies" is what Tolkien called his epic climax to "The Hobbit." And I should be satisfied with that. But what were the Eagles of not a sixth army? If we are going to count wolves as one of the armies, surely it is reasonable to count the Eagles as an army as well. But rather than rename the battle to bring notice to this omission, I like to refer to the fracas as the "Battle of Lonely Mountain."
All Middle-earth enthusiasts know the story that produced the Battle of Five Armies. But a quick run-down of how it happened is expected.
With the death of the dragon (Smaug) the news quickly spread that the fabled treasures of the dwarven King Under the Mountain were no longer guarded. Elves and men began to gather at once to seek a share in the spoils. With the Elves came a host of carrion birds, tagging along near at hand, for they sensed a coming slaughter. (Far to the north around Mount Gundabad, the Goblins were mustering. But this was because the death of the Great Goblin, at the hands of Gandalf and the Dwarves, had angered the Goblins. They were arming to wreak vengence on the habitations of the north. It wasn't until they were ready to march that rumor of the death of Smaug reached them, firing their lust for riches and lending further reason to their hatred to launch a full-scale war.)
The men by the lake, freed at last from their generations-long fear of the dragon, began to remember that much of the wealth horded by Smaug was of Dale craftsmanship too, and not to be kept from them by Dwarves. They joined forces with the Elves and marched up the vale of the Running River to probe the mountain depths. Meanwhile, Thorin and Company had fortified the entrance to the underground halls and defied the army of Bard and the Elfking. Thorin sent word (by "carrier" raven) to his cousin Dain, chief of the Iron Hills. That summons from the new King Under the Mountain brought a force of 500 heavily-armed Dwarves on the double.
As they and the Lake-men and Elves began to do battle, Gandalf suddenly appeared and warned them all that a countless host of Goblins, allied with wolves and wargs, was approaching. So the three armies joined as allies against the common foe.
The Elves stationed themselves on the south spur, while the Dwarves and Bard's men took their places opposite on the east spur. A thin line of a few brave men stood across the open ground between to tempt the enemy into an attack. (The main forces were largely concealed amongst the boulders.)
The main part of the enemy horde came round the end of the eastern spur and entered the ruins of Dale. The advance forces of wolf riders saw the few men further up the vale and rode upon them. The masses of the Goblin horde pressed ahead, and were held up for a moment by the uneven combat. The survivors of the skirmish line ran into the rocks at the feet of the spurs.
Then 1,000 Elves charged out of the rocks and struck into the Goblin flank. Bolg, the chieftain of the Goblin army, turned his warriors to face them. The Elvish charge was soon stopped. But Dain and all the Lake-men and Dwarves charged from the other side of the vale. At once, the Elves charged again with renewed strength in numbers.
The Goblins turned in flight to escape the destruction. Many wolves fastened upon the fallen and pulled down those fleeing. Victory looked like a certainty for the greatly out-numbered allied army.
Then a cry of alarm was heard from the heights of the Lonely Mount. A large force of the nimblest Goblins had scaled the Mountain and come down by narrow tracks to assault the spurs. Knowing of this danger beforehand, the Elfking and Bard had remained up there with a few men each to guard against it. But their strength was inadequate to hold back such numbers for very long.
Down in the valley, the army of Bolg rallied and returned to the attack. Bolg with his bodyguard of huge warriors (Orcs, no doubt) led the assault. Wargs were with them. Elves, Dwarves and Lake-men were then on the defensive, pushed back onto either spur and fighting desperately in two separate battles against overwhelming odds.
Then Thorin and his small unit of companions threw down a portion of their wall and came out. King Thorin called in a booming voice that was heard all down the vale, and to him came all Dain's folk, and many Elves and Lake-men. They joined in a single attack and pushed the Goblins down the valley until Bolg's guard stopped them. The widening vale further weakened the assault, because their flanks were exposed and wrapped. Thorin's attack was turned into a defensive ring, facing a sea of foes. Bolg's guards smashed upon them, and it was no doubt at this time that Thorin suffered his mortal wounding.
The Goblins on the paths down to the spurs renewed their efforts and drove the Elfking and Bard back slowly. As yet, the defenders there held; but soon the Goblins would break through the exhausted guards and wipe them out.
It was at this terrible moment of looming destruction that the Eagles arrived and cast the Goblins down from the heights. Bard's men and the warriors of the Elfking were freed to go down and help their beleaguered comrades below in the valley.
Beorn appeared during that last hour of battle, in great bear-shape. He burst right through the Goblin ranks and slew Bolg. No weapon seemed able to wound the mighty bear. Finally, the havoc of Beorn, the stooping Eagles and the death of Bolg broke the evil horde. The timely arrival of Beorn and the Eagles brought new energy to the united army and they pursued the Goblins mercilessly. Three quarters of the Goblins perished; many from drowning in the Running River below Dale. This battle broke the power of the Goblins in the north for many years.
War-gaming the Battle
Even if you are not a fan of Tolkien, this scenario can be adapted to suit other army confrontations. It is the tactical setting above all else which gives it the appeal as a wargame.
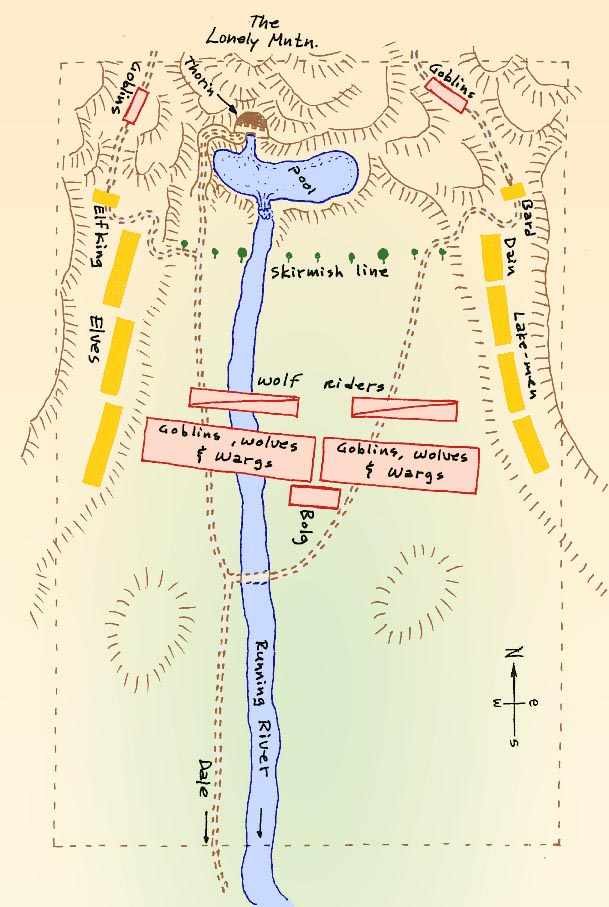
The central feature of the battlefield is the Mountain massif with its two spurs of cliffs. The whole is uncrossable except by the winding, narrow tracks which come down to the valley along the spines of the spur ridges, and by switchbacks. (This is implicit in Tolkien's use of the tiny defending force at the base of each spur being capable of holding back enormous numbers of the enemy for a period time.)
Proceeding down the west side of the vale is the Running River. It plays no tactical role in the narrative, not even being an impediment to the Elven charge. But further down (south of the battlefield) it becomes deep enough to drown Goblins. As a war-game table feature, I treat it as wadeable all down its length; it is even shallow enough for Elves to pike charge across.
The Foothills of each spur are mostly large boulders and rough slopes. this terrain is not very wide before the cliffs rear right up. The defenders get a tactical defensive bonus for being uphill.
As Thorin's warriors were making a last stand on a low hill in the vale, this implies that the floor is not simply flat. Several noticeable hillocks break up the otherwise open terrain of the valley. The valley width is quite narrow up near the cave entrance, but widens rapidly the further south you go. At their original deployment area, the three armies of Dain, Bard and the Elfking can secure their flanks by the spurs; but the widening vale makes this impossible at the far end of the table.
Forces:
Dwarves of Dain: 500 heavy infantry with two-handed mattocks. They can charge in a solid line or column. Their morale is Class B. (At a men-to-figure ratio of 64 to 1 - on a 20mm frontage base - this is 8 figure bases.)
Dwarves of Thorin: The same as above, except morale is Class A. Although 13 Dwarves hardly makes up even a single base, Thorin and Company are represented by placing one dwarf figure on the table. (See Character Stats below.) When Thorin and Company emerge (see Schedule of Events below) they will cause a morale test upon the enemies they encounter.
Lakemen of Bard: There are four commands (see map). The men on the ridge of the spur are medium infantry; the main field army is heavy infantry sword and spear. Bard's group are c. 250 men or 4 bases (his character figure is one of them). 25% are equipped with bows, the main part with long spears. They can charge like pikes do, receiving a combat bonus for rear ranks. Morale Class B. Each of the three main commands in the valley are c. 720 men, or a rounded-up 12 figures each. (Note: the Skirmish Line is a "few" men, which I assign 90 men to be; this is represented by placing two figures on the vale floor at the opening of the battle - see map.)
Forest Elves of the Elfking: Four commands. The Elfking is on his spur with 250 warriors, all medium infantry including himself. Each field command is 1,000 strong, or 16 figure bases of heavy pike infantry. Their charge is the most formidable of all. Morale Class A. (25% can be light infantry with bows.)
Bolg's Guards: 500 heavy infantry Uruk-sized Orcs with massive scimitars (8 bases). Morale Class C. They do not get a charge bonus.
Goblins: There are three commands. Two are 4,000 warriors each on the valley floor (64 bases of medium infantry each); 10% have rather feeble bows; morale Class D. They must test morale if charged. The third command is unarmored and light infantry on the Mountain heights, with orders to force their way down to the valley; it is 4,000 strong too (64 bases).
Wolf Riders: 1,000 light cavalry (20 figures on 25mm frontage bases); morale Class C. While the wolf attacks in melee the rider can at the same time shoot a bow or throw a javelin. They get a charge bonus of +25% to combat value.
Wolves and Wargs: Wargs are the leader element and are 10% of the total. There are 3,000 total lupine auxiliaries to the Goblin army. The figures pack in between the Goblins, and may react differently to the tactical situation than the Goblins do (see Wolf/Warg Action below). Morale Class D wolves, Class C Wargs. (I recognize that few gamers will have on hand some 60 figures of wolf pack. A recommendation is to use 25mm card counters - illustrated of course.) Wolves are treated as unarmored cavalry, Wargs as light cavalry. They get the +25% charge bonus.
Schedule of Events:
1. Wolf riders begin the battle one charge move away from the skirmish line. The two commands of Goblins, wolves and wargs are immediately behind (as also Bolg and his guards).
2. After the third turn of melee with either spur defenders, roll 1d6 at the begining of each turn. The turn a 5 or 6 is rolled brings down one half of the Goblin Mountain command; the second roll of 5 or 6 brings down the second half. Both spurs are now under assault from the Mountain side.
3. All routing Goblin units get an extra morale recovery test when the third command begins to make their attack from the Mountain side.
4. After this point, if Bolg leads an attack Thorin will sally out on a 1d6 = 5, 6. All Dwarves left will rally to him. All commands of Elves and Lake-men will rally to Thorin if they make a morale test (the two holding units of Bard and the Elfking do not test and will not leave their posts of the spurs). Bolg and his people pull back and reform. The united forces of Thorin's command will charge (any remaining forces which did not join the King Under the Mountain will still be in the control of their original players to do with as they see fit).
5. When Thorin's combined command are forced into a defensive ring or square, roll 1d6 each turn until a 5 or 6 brings on the Eagles. Or, if the Goblins on the Mountain break through first, roll 1d6 to bring on the Eagles. When the Eagles come, they do not need to be represented; their effect is an immediate rout of the Mountain Goblin command; all Goblins there being either forced to take instant shelter amongst the rocks, or be seized upon by talons and dropped to the vale floor far below. In other words, the arrival of the Eagles totally nullifies the Goblin forces which have not yet arrived on the valley floor.
6. three turns after the Eagles appear, roll 1d6 = 5, 6 brings on Beorn. He begins in the rear of the Goblin army. Any Goblins, wolves/wargs or guards must make a morale test to not rout when first within 5" of Beorn (Bolg excepted).
7. As a last desperation to stave off total defeat, Gandalf will use magic. He gets 1d6 turns of blasting fire, which fills a corridor 1" wide and 8" deep. All figures within are dead, up to 1d6 figures per blast (If there are more figures in the corridor than 1d6 number of victims, they are not killed). Gandalf will not do any other attacking, but can defend if attacked (note: he cannot be killed at the Battle of Five Armies).
Wolf/Warg Action:
They are interspersed amongst the Goblins. 10% are Wargs, which have a Save of 3. (Out of 60 bases this is 6 Warg bases: two with each command and 2 with Bolg's guard unit.) Any time a Goblin or enemy figure routs alongside or in front of (within 3") a wolf/warg, the wolf/warg figure tests morale: failure requires the wolf/warg to pursue the routing figure and attack it. Whenever a wolf/warg kills a victim it tests morale: failure requires a feeding frenzy which lasts at least through the following turn, and until a roll of 1d6 = 5, 6 releases the wolf/warg figure(s) back into the control of the Goblin command player. When both warg figures for a command are dead, roll a morale test: failure means the wolves are diverted into feeding upon the dead, or they rout away (50/50).
Leader Character Stats:
Thorin (&Co) CRT 5, LDR 3, Save 3 (all enemy figures which come in base contact with Thorin and any dwarves he is leading make a morale test, with the exception of Bolg and his guards).
Dain CRT 1, LDR 1, Save 3
Bard CRT 2, LDR 2, Save 4
Elfking CRT 2, LDR 2, Save 4
Bolg CRT3, LDR 1, Save 2
Beorn CRT 6, LDR 0, Save 5, Hits 3
Gandalf CRT 0, LDR 0, Save 6 (1d6 fire spells in the event that no. 7 above is resorted to).
Command Control
There are no tactical subunits. The player must perform a single order each turn with his entire command. This makes Goblin commands very unwieldy, as they should be.
Goblin Missile Fire:
None is described by Tolkien. The battle below was quickly a melee-only affray; the heights above provided too much cover to Bard's and the Elfking's men for arrowfire to do more than glance off the boulders sheltering them. Only a handful of defenders needed to be on the paths downward at a time, and the main masses of Goblins could not arrive within hand weapon range (very few of them ever used their swords or spears at all, becoming mere Eagle-fodder later in the day).
Logistical Suggestions:
On the side of the evil Goblins are probably many more troops than what I have given. They had "countless, black and red" banners, and "the lands before the Mountain's feet (were) black with a hurrying multitude." I have put in as many baddies as could reasonably hope to come to blows with the out-numbered defenders; the rest must be consigned to milling about off-table, awaiting their chance which never comes. And when the rout starts, these are swept away with it, to be hunted down by the whole populations of the north during the days following the battle.
But having admitted this, it is still likely that 200 Goblin-Orcs is going to tax most miniature collections a mite. We got around this by pressing numerous barbarian type figures into Goblin service. Also, the command attacking from the Mountain side need not be fully laid out; only the leading 8 or so figures need to be on the table at a time. Keep a record of the losses so far, and just recycle the dead to the rear ranks. If either assault column breaks through, the odds say that few anyway will reach the vale floor before the Eagles arrive and dispatch the rest.
In keeping track of which wolf/warg stands are "feeding", a simple method is to lay the figure on its side (or turn the card marker reverse-side up).
It can be argued that the above wolf/warg strengths are too low; especially the warg forces accompanying Bolg. Feel free to add as many more as you believe should be there. We found the wolf packs occupying plenty of space as is; and when they began to turn on the routing Goblins, larger numbers of lupines were somehow not missed!
In our refight it was pretty even until Beorn showed up and slew Bolg, and then the rout took the main part of the Goblins away. By then, most of the lupine element had been dispersed. Gandalf didn't get involved, but his little Ral Partha figure looked nice anyway on the battlefield, safely out of reach on the south ridge. (I thought it strange that none of the gamers asked to have a Bilbo Baggins figure on the table beside him.)