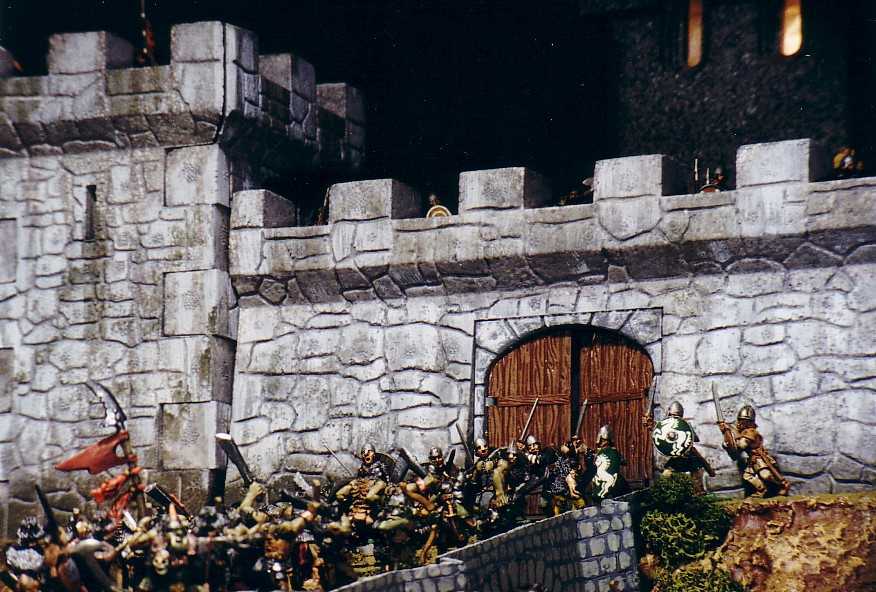
Aragorn and Eomer lead the "handful of stout swordsmen" in defense of the Hornburg gate.
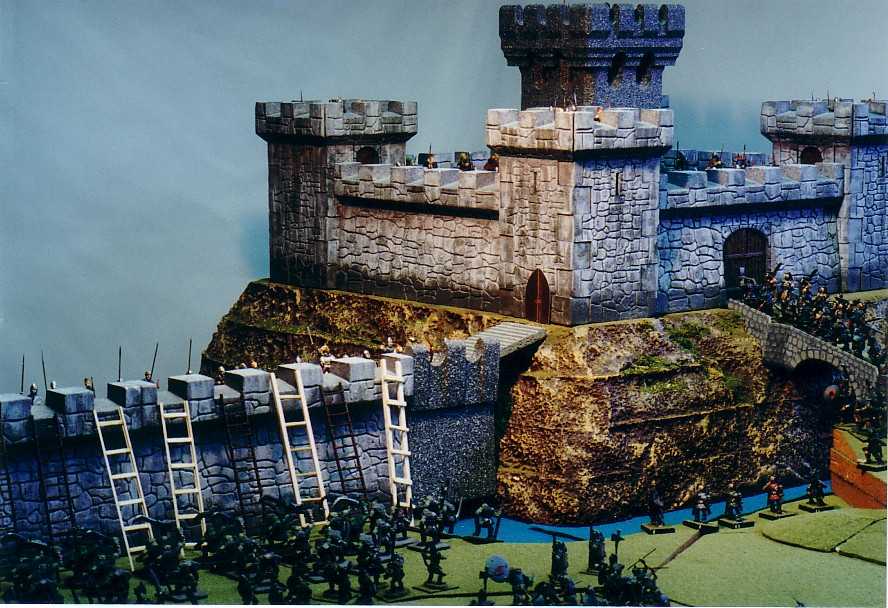
A view of part of the Deeping wall, the removeable section for when the culvert is blown away, and the Hornburg.

Aragorn and company clear the Uruk-hai and Dunlendings from the gates.
THE BATTLE OF HELM'S DEEP
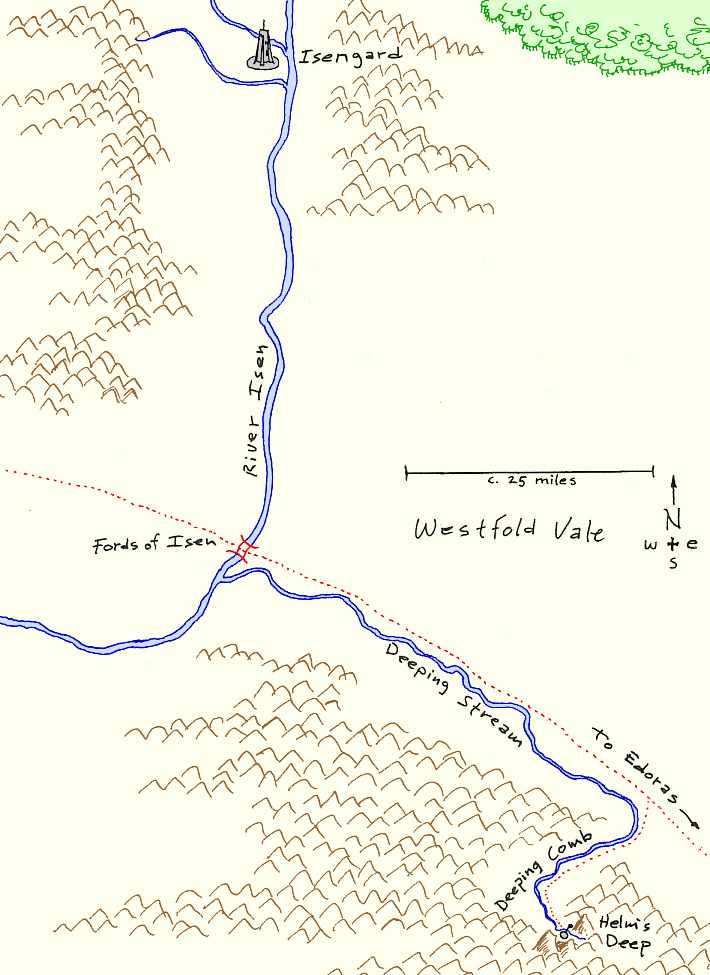
Twelve days prior to the battle of the Pelennor Fields a tremendous victory was won against the power of Saruman (Mordor's ally and puppet). The site of this battle is much more complex than a straight forward fight upon the open Pelennor. Furthermore, I have never seen any mapping of the place and it's supporting terrain that squares with Tolkien's narrative.
Before we can provide a map for a wargames terrain of Helm's Deep we must establish what our very erudite storyteller was saying. Tolkien did not throw extra descriptive details around. His joy seems to have been the beauty of language and turns of phrase; he worked from sketches and maps made by himself and his knowledge of where he was sufficed with a few lines of explanation. (Providing atmosphere was uppermost in importance.) Thus Tolkien can be frustratingly vague if one does not read very carefully to glean all the evidence.
As I have said, all the maps I have seen (including I. C. E's) of the geography and structure of Helm's Deep are wrong. The first place where others have apparently gone astray is found with the opening description of Helm's Deep itself. On page 551 of the Houghton Mifflin (HarperCollins) single volume we read: "At Helm's Gate, before the mouth of the Deep, there was a heel of rock thrust outward by the northern cliff. There upon its spur stood high walls of ancient stone, and within them was a lofty tower." And on the next page we see: "A wall, too, the men of old had made from the Hornburg to the southern cliff...." Now, the difficulty is in the interpretation of this apparently simple description. One reading this for the first time would logically assume Tolkien meant the cliff on the north and another opposite cliff to the south; but this provides all sorts of difficulties later on, for nothing else fits together if the Hornburg is on the northern cliff.
I propose that what Tolkien meant when he said "northern" and "southern" was north-facing and south-facing. If the reader will assume this right from the start, the other details will fit. I will list a few of the most important (an in-depth examination of the subject would take a complete article itself):
The postern gate (by which Aragorn and Éomer launch their flank attack against the enemy battering at the main gate) must be on the west of the Hornburg wall and come around the wall by a narrow path to the main gate. While standing upon the Deeping Wall the Hornburg must be on your left. When the moon sets, it must be over the "hills of the Coomb-side" which places the Deeping Coomb westward of Helm's Deep, not east. And finally, in the last phase of the battle, the forces of Isengard must be trapped in the Coomb by steep cliffs (though not necessarily high) on the east.
The whole nearest approaches to the mouth of Helm's Deep are increasingly narrow. I deem it highly unlikely that the outer defense of Helm's Dike - a mere 440 yards in front of the Deeping Wall - could be "a mile long or more..."; we will have to allow king Théoden a few weaknesses, and apparently spatial relationships is not one of his strong points: the wall of Helm's Dike had always seemed to him a mile long at least, but note that Éomer does not contradict his king, but merely states that a rearguard action in the breach there might be necessary. From this brevity, I read into Éomer's character a respect for Théoden and a desire to not prove the old warrior wrong in front of others.
So we can narrow up the length of the Dike quite a bit and call it a half mile or more instead. At the same time, it should be noted that the entire battlefield is small enough to fit onto the wargames table - in depth. If we do not worry about the length of the Deep behind the wall, but concern ourselves only with the immediate areas behind it, this can be represented with about 20" of depth (at 10 yards to the inch). The distance from the Deeping Wall to the Dike is 2 furlongs, or 440 yards (44"). The distance from the Dike to where the Ents and Huorns form up during the night is another 2 furlongs; so the table in this scale would be the length of about 9'. One can fudge the scale and make it fit into 7' or 8'.
One other point regarding the Hornburg itself: it is a free-standing castle, not one built up against the cliff face of the Thrihyrne as usually shown in maps. Note the wording: "At Helm's Gate, before the mouth of the Deep, there was a heel of rock thrust outward by the northern cliff. There upon its spur stood high walls of ancient stone...." Now, a heel of rock can only mean a projecting peninsula from the main mountainside; and its spur is the furthest-reaching extent of the ridgeline. The description of the postern gate on the west and the extending pathway along "the sheer brink" round to the main gate show that the outer walls of the Hornburg are not some sort of horseshoe-shaped enclosure with cliffs forming the whole of one side. Not only does Tolkien never allude to such a thing, but it would be an absurd way to build a castle: the enemy could get on the steep cliffs above and rain down dislodged boulders into the place. The fact that Aragorn is shown passing around the "circuit" of the outer wall should in itself reveal a continuous and fully-enclosed defensive work.

Now to the business of gaming the battle.
Gamling the Old was apparently Erkenbrand's lieutenant in charge of the garrison of Helm's Deep. He personally led the guard of about 1,000 men which watched for the approach of the enemy from Helm's Dike. The whole garrison under his command might have amounted to over 3,000 men from the regular muster at the Fords of Isen. Only a portion, in the Hornburg mainly, were armed and regular troops left by Erkenbrand to hold the place. The arrival of king Théoden with over 1,000 fully-armored knights greatly increased the strength of Helm's Deep, allowing the Deeping Wall to be held securely. The morale of all the men was high; many had kinsfolk sheltering in the Aglarond caves far up at the end of the Deep. King Théoden's men were the best troops, perhaps 300 in number. The balance of his Éored were hastily mustered Edoras men of all ages; but they were all armed and trained knights. Perhaps one fifth of them carried bows.
Saruman's host was very numerous, at least 10,000 warriors. His main strength was many times as great as all that Théoden had mustered. The orcs and Uruk-hai were the most numerous. From the land of the Dunlendings came thousands of fierce warriors who hated the Rohirrim since ancient times.
1. Defense of the Dike: Gamling the Old and 1,000 or more light infantry ambush the vanguard of orcs. Foolishly, the orcs are marching in deepest night with lighted torches and make excellent pointblank targets for the few archers Gamling has; the rest of his men throw javelins.
Forces for defenders: 18 light infantry, three with bows. Behind the Dike are ponies and horses for their escape back up to the Hornburg, should they disengage in a timely fashion when the going gets rough.
2. The First General Assault: After Gamling and his boys have either retreated back to the Hornburg or died to the last warrior, the whole army of Isengard moves up in the darkness and assaults the fortress. The forces attacking Helm's Deep amount to over 10,000 warriors, represented by the following units: (minus any casualties suffered by the fight with Gamling.)
The garrison of Helm's Deep is placed as follows:
Isengard order of battle is left up to the players, with the exception that one unit of Uruk-hai and one unit of Dunlendings must be employed on the ramp as crew for a pair of battering rams. One is placed before each door of the main gate. Each turn roll 2d6 for each ram: a 10, 11, 12 causes one hit on that door, and each door takes three hits before going down.
The slopes on either side of the Deep and those upon which the Hornburg rests (the Hornrock) are uncrossable to any units.
The Deeping Wall can be scaled at the embrassures only by ladder; the merlons can be scrambled over by grapnel and rope, but it takes two turns of climbing, during which any free defender can cut the rope on a 1d6 = 5, 6. The turn a climber of a rope reaches the top his combat value is zero, until he can gain the wall-walk.
Any siege rules should provide for ladders getting sent down occasionally; and all climbing figures of downed ladders should be killed with a 2d6 = 10-12.
All defenders upon the battlements are +50% combat value.
After the rams have been pounding for three turns, roll at the end of each turn until a 5 or 6 is rolled (1d6). This allows the players running Aragorn, Éomer and Gimli to leave the Deeping Wall and sally out against the battering ram crews through the west postern gate.
(The characters must start where they do in the story; and that places everyone on the Deeping Wall except Théoden and Gamling, who are in the Hornburg.)
While the Deeping Wall is unbreached the defenders do not make unit morale tests. But if the assaulting units from Isengard fail their casualty morale tests, they retreat back out of sight into the Gore and may not return until the next phase of the battle.
The Deeping Stream can be forded anywhere at 2" per turn. Any defenders of an opposite bank get +25% to their combat value against enemies fording.
3. The Culvert Ambush: Once the battering ram crews are routed, if Aragorn and friends have retreated back inside the Hornburg, a pause in the fighting occurs. Both sides may reposition their troops as desired; all routed Isengard units return.
The battering rams are brought up again (unless the gates are already down). But the garrison have blocked up the gateway with debris; allowing only one Isengard figure at a time to fight inside a culdesac of three defenders, should the gate be broken in.
Roll 1d6 each turn after three more turns; a roll of 5 or 6 springs the ambush from the culvert, where up to 3d6 orcs have been gathering beneath the Deeping Wall. Only one figure per turn can get through the culvert, after this initial attack force. If the attack is defeated, the defenders can block off the inside end with stones, baring further entrance; and all Isengard units attacking the Deeping Wall pull back into the Gore again. If the ambush is not destroyed, but instead wins through to the Wall or horse guards, the Rohirrim on the Wall test morale now for any casualties they have taken thus far: failure sends that unit to Aglarond.
4. Fire of Saruman: A charge of explosive is set inside the culvert and a 3" wide breach is made there. All Rohirrim units outside the Hornburg test morale: failure means rout to Aglarond; success means retreat to the Hornburg. All Isengard troops trying to engage Aragorn in melee must test morale each turn: failure means they pull at least 4" away from him.
5. If the battle reaches this stage, the Deep will be in Isengard possession and a full assault upon the Hornburg will commence.
Ladders can be laid against the walls of the Hornburg along the postern path and on either side of the rear gate. All other points may only be assaulted by rope and grapnel: it now takes two turns to arrive at the base of the wall and two more turns of climbing to reach the battlements, during which any free garrison figures can try and cut the ropes with a 1d6 - 5,6. All troops falling from ladders or ropes perish because of the extreme distance down.
6. Aragron's Warning: At any point during the assault, Aragorn can go to the main gate and call for a parley. (Read the book for his words.) If he rolls at least one 5 or 6 with his three LDR d6s then he has put fear into the enemy: all their following morale tests are at -1 to the dice rolls.
7. The Defenders Sally: Following Aragorn's words, the Fire of Saruman is placed again and blows away all the main gate, including any debris piled behind it; the breach is 3" wide.
But just as the hosts of Isengard prepare to enter the Hornburg, the horns of war are sounded upon the great central tower and echo back and forth through the Deep like the clarions of an enormous host approaching. All Isengard units must test morale (at -1 if Aragorn psyched them). At the sounding of the horns, all Rohirrim charge out. Aragorn, King Théoden and 6 heavy cavalry figures charge into the breached main gate. Fear of the sword Anduril causes a -1 morale test upon all figures Aragorn engages (compounded to a -2 if he psyched them).
All Isengard units which fail morale retreat to beyond Helm's Dike, or rout if being attacked. It is now dawn and the long night is ended.
8. The Arrival of Gandalf and Erkenbrand: Place all the defenders along the Dike and in the breach. All Isengard units are between the Dike and the table edge where the Ents and Huorns have arranged themselves during the night. Each unit must test morale: failure sends all orc and Uruk-hai into the "woods"; Dunlendings fall prostrate with terror of the "White Rider" and beg (successfully) for mercy. The morale test is at -2. Any further fighting includes the forces brought by Gandalf and Erkenbrand: 20 bases of medium and heavy cavalry. (In the story they have dismounted as infantry; but I like the option, just in case there are too many Isengarders who still show fight.)
Character Stats:
All figures used to represent characters are in addition to those given in the order of battle.
Final Notes: This battle can go seriously awry at several points. The sequence of phases is for convenience in handling the game as a recreation of the fight in Tolkien's story' this seemed most easily done with weighted morale tests at the critical periods. But anything can happen. Usually, I believe, Rohan will win. But play it several times and you may prove me wrong.
For those interested in using my rules, (as given in "Historical Armies for the Pelennor Fields"), I will now provide a few assault rules to go along with them.
1. Troops carrying ladders can run and place the ladders the turn they arrive at the base of
the wall. If the number of figures on the wall is great than the number of figures placing the
ladder, the defenders at that point roll to throw down the ladder on the 8-10 column on the
melee CRT. If the defenders are less in number they roll on the 1-2 column: any result affecting
the ladder climbers (DB, DBm or DE) puts the ladder down, and a DE will kill the climbing figure
if another 2d6 roll produces a 10-12. Any roll of AB, ABm or AE means the ladder is in place and
the climber may melee.
2. Troops behind and above on the walls are +50% combat value. All melee results except AE or DE are treated as "no result" (except any ABm or DBm still requires a morale test on that figure), when meleeing climbers.
3. If a defender is fighting an assaulter who has gained the wall-walk, and also one coming up a ladder or stair, the figure on the stair or ladder is 1/2 combat value, but the defender loses his +50% combat bonus.
4. All bow fire within 5" of the walls can target any unengaged enemy figures which are visible. Those pushing ladders up or down, or cutting at ropes are visible to enemy fire.
5. All javelinmen within the fortress have an unlimited supply of missiles; but Isengard javelinmen have only three missiles each for each phase of the battle.
6. While they are carrying ladders or working the battering rams, no Isengard troops may shoot bows, throw javelins or melee (their combat value is zero if attacked).
7. All defending figures are +2 targets, that is they are two numbers harder to hit for being above and behind fortifications.
8. The battering ram crews are +1 targets for being protected by the large Dunlending shields held overhead in a tortus-like formation.
9. Ladders may not be thrown down nor ropes cut whilst the climbers are at the top and engaged in melee combat.
10. Morale tests are not rolled for casualties or seeing units routing when within the fortress. There is not unit integrity when within a fortress, and there are no unit movement restrictions or maneuvering rules when moving within a fortress.
(Final note on Armies: The historical types for the participants have already been discussed in my earlier article "Historical Armies for the Pelennor Fields", except for Dunlendings. These barbarians work well as Gauls. For tactics, treat them as Uruk-hai in the battle. - Saruman trained and armed them above their normal capabilities.
Isengard: 16 light infantry spearmen.
Morale: Gamling and his men are class C. Orcs are class D.
At the end of each turn roll 1d6; a roll of 5 or 6 producing an arriving Isengard unit, which can reach the Dike next move. The units arrive in the order given below for phase two. Keep record of any losses suffered.
Helm's Dike is a deep ditch and embankment facing the Deeping Comb. The defenders on top of it are +25% to combat value. the breach in the center is about 8" wide on the table.
-16 light infantry orc spearmen (the unit which fought at Helm's Dike)
8 light infantry orc bowmen; morale class D
12 medium infantry orc spearmen; morale class C
24 light infantry orc javelinmen; morale class D
18 medium infantry Uruk-hai spearmen; morale class C
16 light infantry Uruk-hai bowmen; morale class C
16 medium infantry Uruk-hai spearmen with javelins; morale class D
10 heavy infantry Uruk-hai spearmen with javelins; morale class B
10 light cavalry Snaga orc wolf-riders with bows (may be dismounted as light infantry archers); morale class D
2 units each of 20 medium infantry Dunlending spearmen; morale class C
12 heavy infantry Uruk-hai spearmen; morale class C
10 light infantry Uruk-hai bowmen; morale class C.
16 light infantry javelinmen in Aglarond caves; morale class C
16 medium infantry javelinmen in Hornburg; morale class C
10 heavy infantry javelinmen in Hornburg; morale class C
6 light infantry bowmen in Hornburg; morale class C
-18 light infantry (what's left of Gamling's unit) in Hornburg
16 heavy infantry Rohirrim (dismounted knights) on the Deeping Wall; morale class B
4 medium infantry Rohirrim (dismounted cavalry) bowmen on the Deeping Wall; morale class B.
(Note: all the horses are kept behind the Deeping Wall, except those of Théoden's household knights, about 300; or in this scale, enough for 6 heavy cavalry when they mount up later on, in the Hornburg.)
(Note this exception: If the gates are already down and there is fighting there, then there is no pause; all routed Isengard units return. Proceed now with the rest of phase 3.)
(Note: the defenders of Aglarond begin this phase on the table edge. Any units which were placed to contain them withdrew upon hearing the horns to a point just inside the Deeping Wall, from which postion the make their required morale test.)
These are based on my earlier article, "Historical Armies for the Pelennor Fields."
Aragorn +2 CRT +3 LDR +5 Save
King Théoden +1 CRT +2 LDR
Éomer +2 CRT +1 LDR
Gimli +2 CRT +3 Save
Legolas +2 bow +1 CRT +2 Save
Gandalf +0 CRT +0 LDR +6 Save
Erkenbrand +0 CRT +1 LDR
All characters on the Isengard side will have to be made up - not a one is mentioned in the story. Three points are allowed each, but LDR cannot be higher than +2. One is allowed per player. If there are not enough players to run all the Helm's Deep defender characters, then run Aragorn and any others you have enough players for.
(The Westfold Vale militamen are dismounted cavalry and light infantry javelinmen levy, who cannot stand up to cavalry, but otherwise behave the same: bows, no better than those used by orcs, can be substituted for javelins).