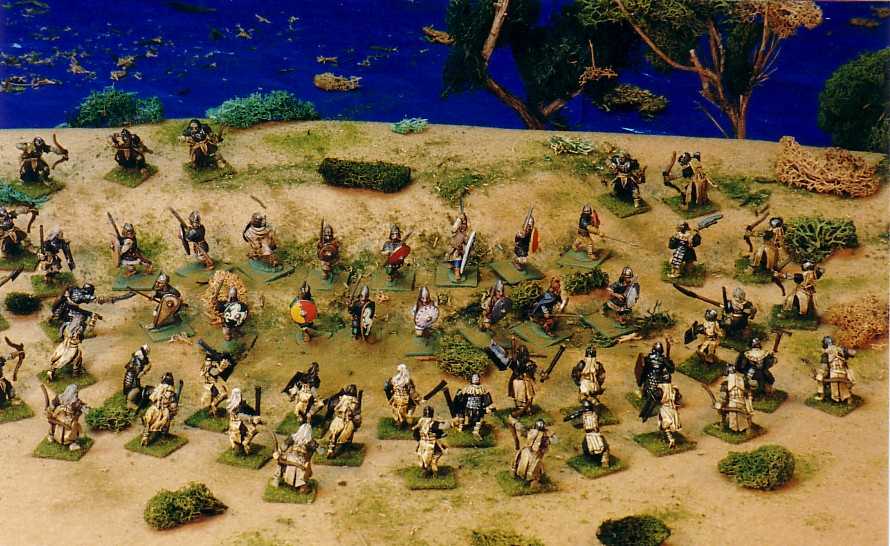
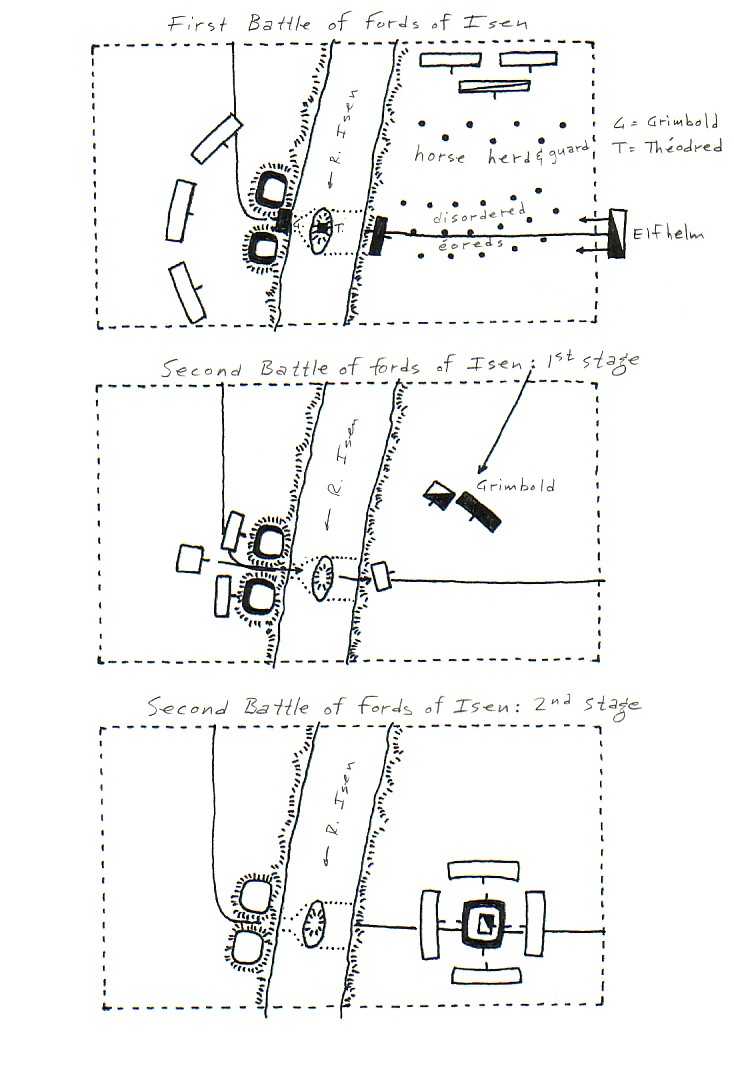
On the eyot, Théodred and his men are attacked by overwhelming numbers
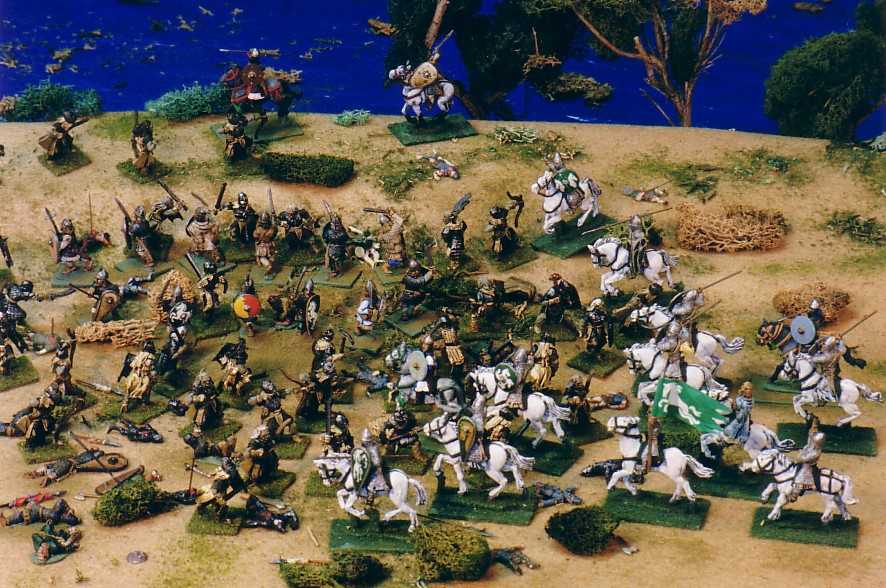
Elfhelm to the rescue
Théodred's command on the eyot is overrun, but Grimbold hangs on and the Uruks are slaughtered to a man.
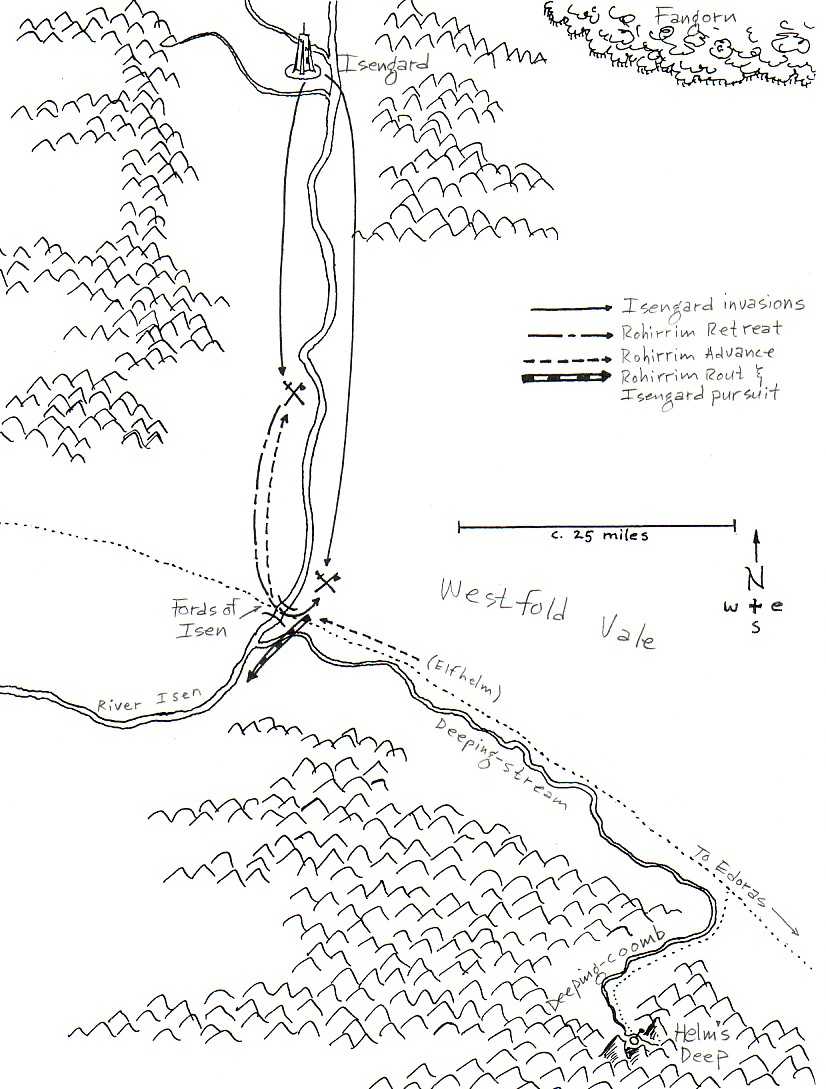
In the days before the War of the Ring, when Isengard was in friendly or at least neutral hands, the river Isen formed an effective barrier between the Westfold and the lands of the Dunlendings, the hereditary foes of Rohan. But with the treachery of Saruman, Isengard rendered the whole river useless as a strategic frontier.
(1) Théodred the marshal of the west-mark; Erkenbrand the lord of Westfold, and Grimbold his marshal, (2) were all determined by tradition to defend the old frontier come what may. In this they were no doubt mistaken: for Saruman’s army of Orcs, Uruk-hai and Dunlendings was far too powerful for the west-mark to handle alone. What would have been more prudent would have been to remove all the people to the safety of Helm’s Deep and unite the troops from the west-mark with those of the kingdom. Nevertheless, a strategy utilizing the fords of Isen was resolved upon: and Théodred came to join his cavalry to the Westfold infantry levy who were holding the fords of Isen, under the command of the marshal Grimbold. Erkenbrand meanwhile was preparing Helm’s Deep for the great and final defense.
The whole mounted force (save three companies(3) remaining on the east side to guard the spare horses) moved over to the west side of Isen and rode northward. Twenty miles above the fords the vanguard encountered the leading elements of Saruman’s main army marching south. A sharp fight drove these back, and the Rohirrim pursued until they came upon the main body: pikemen drawn up in a phalanx on the other side of a trench. Théodred attacked them. But soon more troops of Isengarders were moving up on the left flank of the Rohirrim. It was only when Grimbold came forward with the rest of the cavalry that Théodred was able to extricate himself and his units. During the lull which followed, more Isengard forces were seen in the distance, on the opposite side of the river, hastening southward to attack the defenses from the Westfold side. Théodred and Grimbold retreated rapidly. But so fleet-footed were the forward-most of their enemies that Grimbold, commanding the rearguard, had perforce to turn often and drive them back: as the Rohirrim arrived at the fords and crossed over in disarray, Grimbold’s cavalry of the rearguard had hardly outdistanced their pursuers. On the eastern side of the river, the Rohirrim were sorting themselves out; when the host from Isengard on that front burst into view and attacked them before they could get arrayed: this army was smaller than that on the west side, but was an elite force of wolfriders, Dunlending cavalry and swift, heavily-armed Uruk-hai. The Rohirrim were pushed hard and fell back southward of the fords, pursued by their assailants along the river. A picked number of these - heavily mailed and bearing great axes - turned aside and destroyed the guarding force of Westfold militia which Grimbold had stationed there: then the Uruks pushed into the river and attacked Théodred, who had placed himself on the eyot with his household warriors. Grimbold, commanding the defenders on the west side of the fords, saw the peril of his prince and took what troops he could nearby with him to attack the Uruks in the rear. He burst through and arrived at the side of Théodred just as he fell mortally wounded. The attack upon the two earth forts on the west side was held off by a stiff defense from the Westfold infantry. But these would have been overcome from the rear, and Grimbold slain too, if the marshal of Edoras, Elfhelm, had not suddenly arrived on the field with four companies of cavalry: two he sent to attack the Isengard units still on the east bank, who fled north: two he led himself to attack the enemy on the eyot. These were wiped out to a man and Grimbold saved. Night fell, and Elfhelm and Grimbold arranged their battered forces in expectation of a renewed attack any time soon. But it never came. Morning saw the return of the Rohirrim from south of the fords: in the night, their pursuers had finally broken off and withdrawn. No one knew at the time, that Saruman had given explicit orders to his commanders to slay Théodred at all costs: and these singular orders had accounted for the sudden dispersal of the enemy into the night. Had the attack continued, most likely the fords would have fallen to the more powerful army of Isengard.
The second battle of the fords of Isen occurred on March 2, seven days later. By this time, Saruman had reorganized his army and was now prepared to make his main attack down the east side of the river. The weakness and uselessness of a defense of the fords was now proven. For Grimbold preferred to make the main defense still at the earth forts on the west side: fearful that if not strongly held, the enemy would merely slip over the river and attack the Rohirrim army in the rear. Elfhelm pushed for a full array on the east side to face whatever came down there from Isengard: and that only a small delaying force should be left to hold the fords. A compromise was arrived at: Grimbold placed most of his infantry on the west side of the fords, while Elfhelm spread out his cavalry and that of Théodred’s which still remained, with the rest of the infantry, along a ridge which ran from the river eastward. All day he faced down the might of the army of Isengard without result. (It appears from the narrative that there was no general clash, but only threat of the same, while the Isengard commander waited for word that the fords had been seized before making his attack.) On the west side of the Isen, a smaller force of the enemy attacked the forts; a body of Uruks forced a passage between them and crossed the river. But Grimbold took troops from the main battle line and forced the enemy back. A fresh force of uncommitted Uruks drove Grimbold back to the east bank, and he manned the steep slopes overlooking the fords. The enemy did not attack any more that day. At night, Elfhelm retired to a point north of Grimbold’s camp and stationed his men in small companies in an extended line to screen against any advancing enemies. At midnight, the Isengarders on the west side of the river crossed enmasse and attacked the Rohirrim camp: Grimbold had pulled his troops back into a shield-ring, rather than try to hold the banks against great odds. At the same time, wolfriders suddenly appeared out of the north and got between Elfhelm’s men and Grimbold’s encampment and began to surround his separated companies in the dark: he could do nothing except try to pull together as many horsemen as possible and stand off the enemy attacks while withdrawing to the east. The rest of the Isengard army on the east side of the river came down from the north and attacked Grimbold’s camp: first orcs, then Dunlendings, who were larger and more up to the work, although not so well armed nor trained as the Rohirrim warriors. Before darkness had fallen, Grimbold had sent off messengers to Erkenbrand for help. But there was little hope of any succor: and now with the enemy all around them, any small hope Grimbold had held of Erkenbrand coming was dispelled. He resolved upon a plan to attempt escape. In the darkness, which was relieved by a waxing moon, Grimbold mounted up all who still had horses - about half an éored - and sent them out of the shield-ring on the east side: the enemy was driven back there, and the horsemen split and attacked the enemy to the north and south in their rear: fearing that they were under attack by arriving reinforcements, they drew off in consternation. In the moment of relieved pressure, Grimbold formed his personal troops into a rearguard, and with the mounted men they covered the sudden retreat of the rest of his army into the night: the moonlight was fortuitously hidden by clouds and aided in their escape. The Isengard commander only let his troops pursue for a short way, then reformed his army and struck the road toward the Hornburg.
Even though the battles at the fords of Isen were defeats for Rohan, they achieved two beneficial results: the combats had cost the Isengarders many casualties, and they had been delayed long enough for reinforcements to reach the Hornburg, led by king Théoden himself. Their inclusion in the garrison made the battle of Helm’s Deep on the night of March 3rd a victory.
War-gaming the first battle of the fords of Isen
This can be played out in two parts, or the preliminary battle can be dispensed with and only the main fight concentrated on.
If you play the preliminary fight on the west side of the river, then the only forces on the side of Rohan are the cavalry under prince Théodred and Grimbold. The prince is in the van with 500 men: 350 lancers and 150 mounted archers. He has scattered and pursued the outriders of the west army of Isengard. Now he finds himself face to face with the main body - 3,000 Uruk-hai or Dunlending light and medium pikemen and bowmen behind a trench, which stops all cavalry charges and gives the defenders a +25% combat bonus. Grimbold is following up with the main body, 600 more lancers.
On the first turn of combat between Théodred’s van and the pikemen, each side rolls 1d6=5,6 to bring on more of their troops. As soon as he rolls his first 5 or 6, Grimbold enters with his 600 lancers from the south. Isengard forces enter from the west, in the following order:
A. 2,500 mixed Uruk-hai and orcs, mostly medium infantry with some heavy, sword and spear.
B. 1,500 orcs, light infantry spear and sword.
C. 1,000 Dunlendings or orcs, light infantry spear and sword.
The object of the game is for Rohan to get off the south edge with as many troops as possible: after making at least one turn of combat into the pikemen. Simple enough. The Uruk-hai can trot indefinitely like cavalry do: this will allow them to keep up a close pursuit. (Comparative speeds might be: heavy cavalry trot 8" per turn: light and medium infantry trot 8" and 6" per turn.)
The main battle at the fords begins with the cavalry on the east side of the river in scattered order (at least 3" between bases); assume around 1,200 men (or what is left after casualties from the preliminary battle – no returned casualties, as there is not enough time); the spare horses are there too. The Westfold infantry are manning the pair of western forts with 1,500 medium infantry sword and spear each, with around 100 light bowmen in each fort as well. On the eyot stands Théodred with his éored of around 120 dismounted men. Grimbold is between the forts with 50 heavy infantry (dismounted horsemen), and the pick of the Westfold infantry, 450 heavy infantry spear and sword. The eastern end of the fords is held by 1,000 light infantry sword and spear.
The west army of Isengard (all the forces given above, minus casualties – which are not returned, as there is insufficient time) is in position to begin an attack on the forts, just outside bowshot (20"): while on the east side of the river the eastern army of Isengard has arrived: some 600 to 1,000 light wolfriders, wargs and Dunlending light cavalry in front of two large battalions of Uruk-hai totaling around 2,500 warriors, medium bowmen and heavy spear and sword, or axe. The wolfriders and Dunlending cavalry charge and begin to slay and drive off the horses of the herd, and those Rohirrim set to guard them (roughly three éoreds, or around 350 men, out of the total of c. 1,200). Note, that if the guards rout they and the horse herd – c. 10 bases – will run directly back toward the disarrayed Rohirrim. The horse herd bases are a zero combat value, but must be eliminated by any Isengarders in base contact with them before they may move on.
Beginning with the first game turn, Rohan rolls morale checks once per turn for the scattered companies: success means they can begin to move into open order on the following turn; a second success means they can now receive orders and move tactically on the following turn; but any bases already under attack may not be rolled for control: a morale check that fails will rout the bases one charge move to the south, where they may try again to get under control if they are not being attacked.
The Uruk-hai units on the east must make a morale test to continue pursuing the routing/withdrawing Rohirrim south of the fords. Failure means that the Uruks must turn toward the eyot and attack Théodred (as per their orders) at the greatest possible speed. The Isengarders cavalry must test morale to NOT pursue any Rohirrim routing/withdrawing from the table south of the fords: failure means they also leave the table in pursuit. They test at "D" class for this "performance check." (Once in pursuit of any fleeing enemies wolfriders really dislike breaking off, and regaining control over them is not likely: with a "D" class test of needing 9-12 on 2d6, this is only a c. 28% chance.)
The first combat turn that Rohirrim cavalry come in contact with wolfriders, they must test morale successfully or rout. If they test good, they remain good against wolfriders for the rest of the battle.
After the game has been going for eight turns, begin rolling 1d6: on turn nine a roll of 6=Elfhelm on the east road with 500 cavalry from Edoras; 10th turn a 5,6=Elfhelm et al arrive; 11th turn a roll of 4-6=their arrival; and so on until turn 14 at the very last, when Elfhelm arrives no matter what. It is very late in the day, and any Isengarders leaving the table may not be pursued.
Terrain note: the east and west banks at the fords are steep and give a +25% combat value bonus to any uphill defender infantry. The banks of the fords are the same width as the length of the eyot on the east end, but are as narrow as the passage between the two forts at the west end (see map). The banks of the eyot afford no combat bonus, being very shallow.
Playing the second battle of the fords of Isen
Seven days later, Isengard attacks down both sides of the river again. This time the forces are reversed: the smaller force (2,500 Uruk-hai medium infantry bowmen and heavy sword and spear; 1,000 medium Uruk-hai sword and spear; and 1,500 light infantry orc sword and spear: a commander who is +1 LDR is over this force) are on the west side: wolfriders and Dunlending cavalry (over 600 strong) are on the east side; with 2,500 Dunlending infantry and over 3,000 Uruk-hai and orc infantry on the east side.
Facing them are the remains of the Westfold army and Elfhelm’s cavalry. Either take back 60% of the losses suffered in the first battles, or the following troops mix if you are playing this battle as a separate game: 1,200 medium infantry and 60 light bowmen in each fort: 1,000 mixed infantry (and unhorsed cavalry) and 500 cavalry under Grimbold. (Elfhelm has what is left of his 500 plus the residue of Théodred’s men: probably not more than c. 850 cavalry: assuming a return of 60% losses to a force reduced to a quarter of its full size in the earlier battles, and counting some Riders as now on foot.)
The actual fighting is between the forts and the west Isengard army; and Grimbold’s entry with his cavalry and infantry on the first turn from the north. (Note that the unit of Uruk-hai shown on the map as already over the Isen is in their intended position and where they end up in the story narrative: in the game itself things may go considerably differently: and all Isengard forces begin the game 20" away from the forts.) Elfhelm’s forces are off-table and not considered as part of the battle, since he cannot leave the position he is in, facing the main Isengard army. If Grimbold’s counter-attack drives right up to the forts, he can extract his garrisons there and move them across to the east bank: this being accomplished will end the first phase of the game. (If any fighting is done on the slopes overlooking the fords, the uphill infantry - not cavalry - get a +25% combat bonus against those fording the river).
Return 25% of losses to both sides. All surviving Rohirrim on the east bank will be attacked in their camp after darkness falls. Elfhelm is dispersed into the darkness to the east: all the Isengard cavalry are in pursuit of him and his cavalry. Place the eastern Isengard army - sans wolfriders and Dunlending cavalry - on the table when the fighting between Grimbold and the western Isengarders is concluded. The game is therefore played out in two phases: the battle for control of the fords: and finally the Rohirrim camp surrounded.
The object of the second phase is to get as many Rohirrim off the table as possible. But since the game begins with the square of shields surrounded, this is only accomplished if the pressure from Isengard is removed. In the story, Grimbold opens his square and charges out with his mounted troops: who then circle around in the darkness and hit the Isengarders in the rear from north and south. They pull back in dismay, fearful of new arriving troops: and in this lull, the square breaks for freedom, most of them making a clean escape from the field. When (or if) Grimbold sends out his remaining horsemen, the “square” of infantry can withdraw to either side (or go into open order) and let the cavalry charge out: any Isengard units in the way must test morale to stand as “D” class. The Rohirrim cavalry can break into two subunits and operate independently of each other. If their attacks rout a sufficient number of Isengard units for the Rohirrim foot to move away, they may do so. They may break off combat to effect this maneuver: the Isengarders may not pursue until they make a “D” class morale check. And any not already in melee combat must make subsequent "D" class checks each turn to keep pursuing.
Isengard units that rout from "seeing" nearby units rout will not actually flee, but stand where they are, or pull back one run move away if they were already in combat.
Dunlending units which break off attacks must test as "D" class to resume an attack. (They do not see as well in the dark as orcs.)
Although the Rohirrim cavalry can attack in the dark, they cannot charge with a combat bonus. Even though they do not get this effectiveness, their attacks still count as though they had a charge bonus for morale purposes, i.e. the Isengarders who must test to stand before a cavalry charge must still test: and any units caught in the flanks or rear must test to stand.
Special rules for infantry (not cavalry) in square:
No "back" results drive the ensquared figures back; and they do not pursue out of the square if they score a "back" result on an enemy figure. Remember that no morale checks are made upon the square for casualties unless a figure in the square suffers an attack in the rear, or must turn to face such an attack to prevent his rear from being attacked: if this occurs, then the square is defined as "broken." All units in the square which have suffered at least 25% losses must now test morale. All cavalry fighting from within a square must advance and retreat according to the "back" results on the combat chart.
Morale classes
The Rohirrim are all “C” class infantry. The cavalry are mixed “C” and “B”; that is, the bowmen and light cavalry (together roughly a third of the total) are “C”, while the mediums and heavies are “B”.
Isengard morale is mostly “D” class; but the troops behind the trench are all “C”, and the units on the east side of the Isen in the first battle are “C” with one “B” Uruk-hai unit. The rest can be rolled for, with 1d100: 00-59=D, 60-89=C, 90-99=B. (This is directly applicable to my rules, which you can have in MW No. 170.)
Leaders
Grimbold +1 CRT, Elfhelm +1 LDR, Théodred +1 CRT +1 LDR (CRT = combat results table bonus; LDR = leadership bonus to morale checks). The Isengard leaders are again never mentioned: there should be one Dunlending chieftain +1 CRT, and two Uruk-hai commanders: one +1 LDR, the second in command; and the commander in chief +1 CRT and +1 LDR.
Commander figurines are in addition to the troops given.
Fortress bonuses to combat and morale
The defenders of the forts receive a +50% to their combat value while at the wall. In our rules the only way to get inside a fort is to kill or rout off the defender: there is no "pushing and shoving" back and forth with a wall between. All figures inside the fort are immune from morale checks; and if an attacking unit fails from taking 25% casualties, any figures already inside the fort do not rout if their outside companions do. The Rohirrim defenders do not make casualty morale checks while inside the forts; but individual figures can still be routed in melee combat.
Missile fire protection to the defending Rohirrim is +1 to the needed dice roll: e.g. a 9 or better to hit becomes a 10 or better.
Playing the battles - logistics
The numbers I have given for the armies are probably close enough to be taken literally. In my earlier article on Helm’s Deep (MW No. 162), I estimated Saruman’s strength at over 10,000 warriors. Obviously the main part were employed in the battles at the fords of Isen. But there were other troops out and about: and even after the losses sustained at the two battles, his strength was still in excess of 10,000 for the final battle of the Hornburg. The whole muster of Rohan, as claimed by king Théoden, would have fielded 10,000 cavalry(4) . With the east and north of the Riddermark threatened at the same time by Mordor, and taking into account the hastiness of the muster required to meet all of these threats, it is extending the maximum number of cavalry to this campaign to allow the total of 2,000 that I have given. At 50 men per base this is only 40 bases of cavalry. Each 1,000 infantry is provided with 16 bases: my own Isengard army is over 160 bases, mostly infantry. If this is too much for your resources, just reduce everything proportionately to what is available. The game need not be large to be enjoyable: just keep the forces relatively the same as given and everything should work out okay.
The historical army types which work very well to reflect these armies are given in MW issue Nos. 162 and 170. I haven’t changed my mind about this very much since first writing those articles years ago. However, my armies lists HAVE changed: notably, the Vikings/Uruk-hai no longer get “pre-contact” missile fire; neither should the dismounted Rohirrim. Also, bow fire is in open order for all these troops - whereas before I had almost everybody shooting from close order, and now pretty much only Gondor and Dol Amroth can do this. The quality of bow for the Vikings/Uruks also was lowered to that of orc/goblin bow. All missile fire from horseback is close order for javelins and open order for bowmen. This is so for wolfriders as well (although they operate in open order routinely anyway).
Our first game of the first battle of the fords of Isen produced a rather “historical” outcome, but the details differed: the eyot was overrun by Uruk-hai archers and Théodred killed; but the Grimbold figurine had “died” earlier in the pass between the forts: we rolled to see if he had in fact survived individually, and he had, so we assumed him to have charged out onto the eyot. His “recycled” figurine was saved by the last of the fort garrison, who had barely managed to see off the west Isengarders by the skin of their teeth. Elfhelm, who came on very early, had not been able to make headway against the Uruk-hai warriors and pulled off slightly to the east. The eastern guarding force of Rohirrim light infantry was swept away quickly by the wolfriders (who refused to pursue the Riders as in the story) and Uruk archers, who then overran the eyot and killed Théodred. When he was dead, the Isengarders withdrew north, hurried along by Elfhelm from a safe distance.
The second game of the first battle of the fords of Isen was wildly different. It started out much the same, with the north fort being virtually overrun, with Isengarders beginning to emerge toward the eyot, massing to attack it. The south fort was a drawn battle. While this time in the center Grimbold kicked butt, losing only a single figure from his unit (the luck was really one-sided there). On the east side of the Isen, the Rohirrim were routed off the field much swifter than in the first game; and the wolfriders again beat the odds and stayed their pursuit. Elfhelm came on the field in an extended line on turn ten, and charged into the Uruk-hai axemen before they could arrange themselves into a solid line: they broke, and the charge swept the dregs down to the river bank where the Uruk archers were peppering the shields of the Rohirrim light infantry, who had routed to the eyot early and reformed there. These advanced back across the river, helping the cavalry of Elfhelm to catch the Uruk archers front and rear. They routed almost at once. At this point the wolfriders, who had till then been maneuvering into the rear of Elfhem's unit, gave up the contest and fled back toward Isengard. The Dunlendings and Uruk-hai in and around the north fort saw their comrades outside getting beaten by Grimbold, and the battle going to pieces on the east side of the river, and finally withdrew in haste, abandoning all further thoughts of going out to the eyot to kill Théodred, who had never lifted a finger throughout the entire brief battle.
Replaying the second battle of the fords of Isen was done twice in the first phase, and only one playtest in the second: because both of the first phase games produced about the same percentage of losses, though in different ways. And one playing of the second phase was shown to be quite in line with the average expectation from the dice: nothing weird occurred.
In the first game, the morale of the light orcs broke (they were "D" class) and the rout "snowballed" until the entire Isengard army on the west side of the river was in rout. The Rohirrim garrisons checked to see if they would leave their forts in pursuit and did: up till then Rohan had been getting by far the worst of the missile exchange. But Grimbold had no opposition to his move across the river, and everyone withdrew to the east side.
The second time the first phase was played, much of Isengard's army routed again as they attacked the forts; but enough stayed on the field to prevent the Rohirrim garrisons from even thinking of coming out in pursuit. The routed units returned, and the north fort was overrun completely. The south fort held out, but lost heavily in an exchange of javelin fire to the Uruk-hai unit which moved between the forts and crossed the river. The cavalry arrived and routed off this unit; and Grimbold then made contact with the dregs of his garrison and withdrew them.
After receiving back 25% of their losses, the Rohirrim formed up in a single rank of infantry in square; with the cavalry in the center with a few extra infantry bases. The whole square was assaulted, but held out and inflicted a morale check from casualties on the Dunlendings who were attacking the south side of the square: their rout "snowballed" throughout the Isengard army until only the west side of the square was still under attack. Grimbold sent six of his ten bases of cavalry out - keeping back four bases as a reserve and anticipated rearguard. The Isengarders resumed an attack of the north-east corner of the square, and were moving in on the north with heavy infantry again, when the Rohirrim arrived in the rear of the units to the north and south, causing routs and the withdrawl of the fresh attacks. The Dunlendings (and some Uruk-hai) who had been continually attacking on the west side of the square finally had had enough of casualties and rumors of arriving fresh enemy troops and routed away. The entire square then broke up and streamed off the table to the south-east to safety. Only one Dunlending force tried to inhibit this move, but the cavalry attacked them and routed them off.
1. J. R. R. Tolkien’s narrative of the battles of the fords of Isen is found in Unfinished Tales, Houghton Mifflin 1980, pp 355-73.
2. The Riddermark (Rohan) was divided into three districts: the first marshal had his headquarters at the royal capital of Edoras. Elfhelm held the rank of marshal and served his king at Edoras: but he was not the first marshal, for in Théoden’s reign that position was vacant. The second marshal was commander of the west-mark: this was Théodred the king’s son. The third marshal was over the east-mark: this was Éomer, the king’s nephew. Erkenbrand was lord of Helm’s Deep and the Westfold: it seems that Grimbold was his marshal; for he held the rank of marshal in that part of the realm, without being marshal of the west-mark, which was Théodred’s title. The marshals appear to rank in order as follows: first marshal (non-existent at the time of the War of the Ring); second and third marshal, equal in rank to each other, but with separate spheres of command; marshals of great lords, such as Grimbold to Erkenbrand; marshals of éoreds, such as Elfhelm as the marshal of the éored of Edoras.
3. The term “company” and “companies” used by Tolkien in his narrative appear to be interchangeable with the more usual term “éored.” Elsewhere, the strength of an éored is stated to be “...not less than 120 men (including the captain), and to be one hundredth part of the Full Muster of the Riders of the Mark, not including those of the King’s Household.” (ibid page 315) Therefore, I have treated “company” and éored as the same, and assume a minimum of 120 men each, rounded up to convenient whole figures.
4. Return of the King page 831, The Lord of the Rings Houghton Mifflin single volume.